FFDC是First Failure Data Capture的缩写,是ThinkSysteme服务器用来进行故障诊断,信息收集的最主要的日志文件。收集FFDC日志的方法有很多,本文根据官方文档对此进行一个概括性的总结。
工具及机型汇总
下表总结了在不同机型产品上收集FFDC日志可以使用的工具
| 工具 | ThinkSystem V1系列服务器 | V2系列服务器 | V3系列服务器 |
|---|---|---|---|
| XClarity Controller (XCC) | ✔ | ✔ | ❌ |
| XClarity Controller 2 (XCC2) | ❌ | ❌ | ✔ |
| XClarity Essentials OneCLI (LXCE) | ✔ | ✔ | ✔ |
| XClarity Provisioning Manager (LXPM) | ✔(LXPM v3) | ✔(LXPM v3) | ✔(LXPM v4) |
| XClarity Administrator (LXCA) | ✔ | ✔ | ✔ |
| XClarity Orchestrator (LXCO) | ✔ | ✔ | ✔ |
| XClarity Integrator for Windows Admin Center | ✔ | ✔ | ✔ |
| XClarity Mobile app (LXCM) | ✔ | ✔ | ✔ |
| External diagnostics handset or Integrated diagnostics panel | ✔ | ✔ | ✔ |
| Redfish API LogServices | ✔ | ✔ | ✔ |
| ThinkSystem System Manager (TSM) | ❌ | ❌ | ❌ |
备注:
1,XCC/XCC2/LXPM均内置于服务器,无需另行安装。
2,LXCE/LXCA/LXCO/LXCI/XClarity Mobile属于独立的工具或软件,需要单独下载,有些需要单独购买。
3,并不是所有服务器都配备有外部诊断工具或内置诊断面板,需要以服务器的具体硬件配置为准。
4,ThinkSystem System Manager只支持ThinkSystem SR635/SR655机型。
5,在BMC没有网络的环境下,可使用本地控制台访问LXPM。也可通过本地OS以带内的方式访问XCC/XCC2或以带内的方式运行OneCLI来收集FFDC日志。同样可以使用外部诊断工具或内置诊断面板收集FFDC日志。
6,在BMC有网络的环境下,可通过带外的方式访问XCC/XCC2/LXPM/LXCE/LXCA/LXCO/LXCI/XClarity Mobile收集FFDC日志。
7,上述工具/软件的发布与服务器的发布存在时间差,所以如果遇到问题,请先偿试使用最新版本的工具/软件,通常最新版本会支持最多的服务器型号。
FFDC日志收集方法
一、通过XCC/XCC2收集FFDC
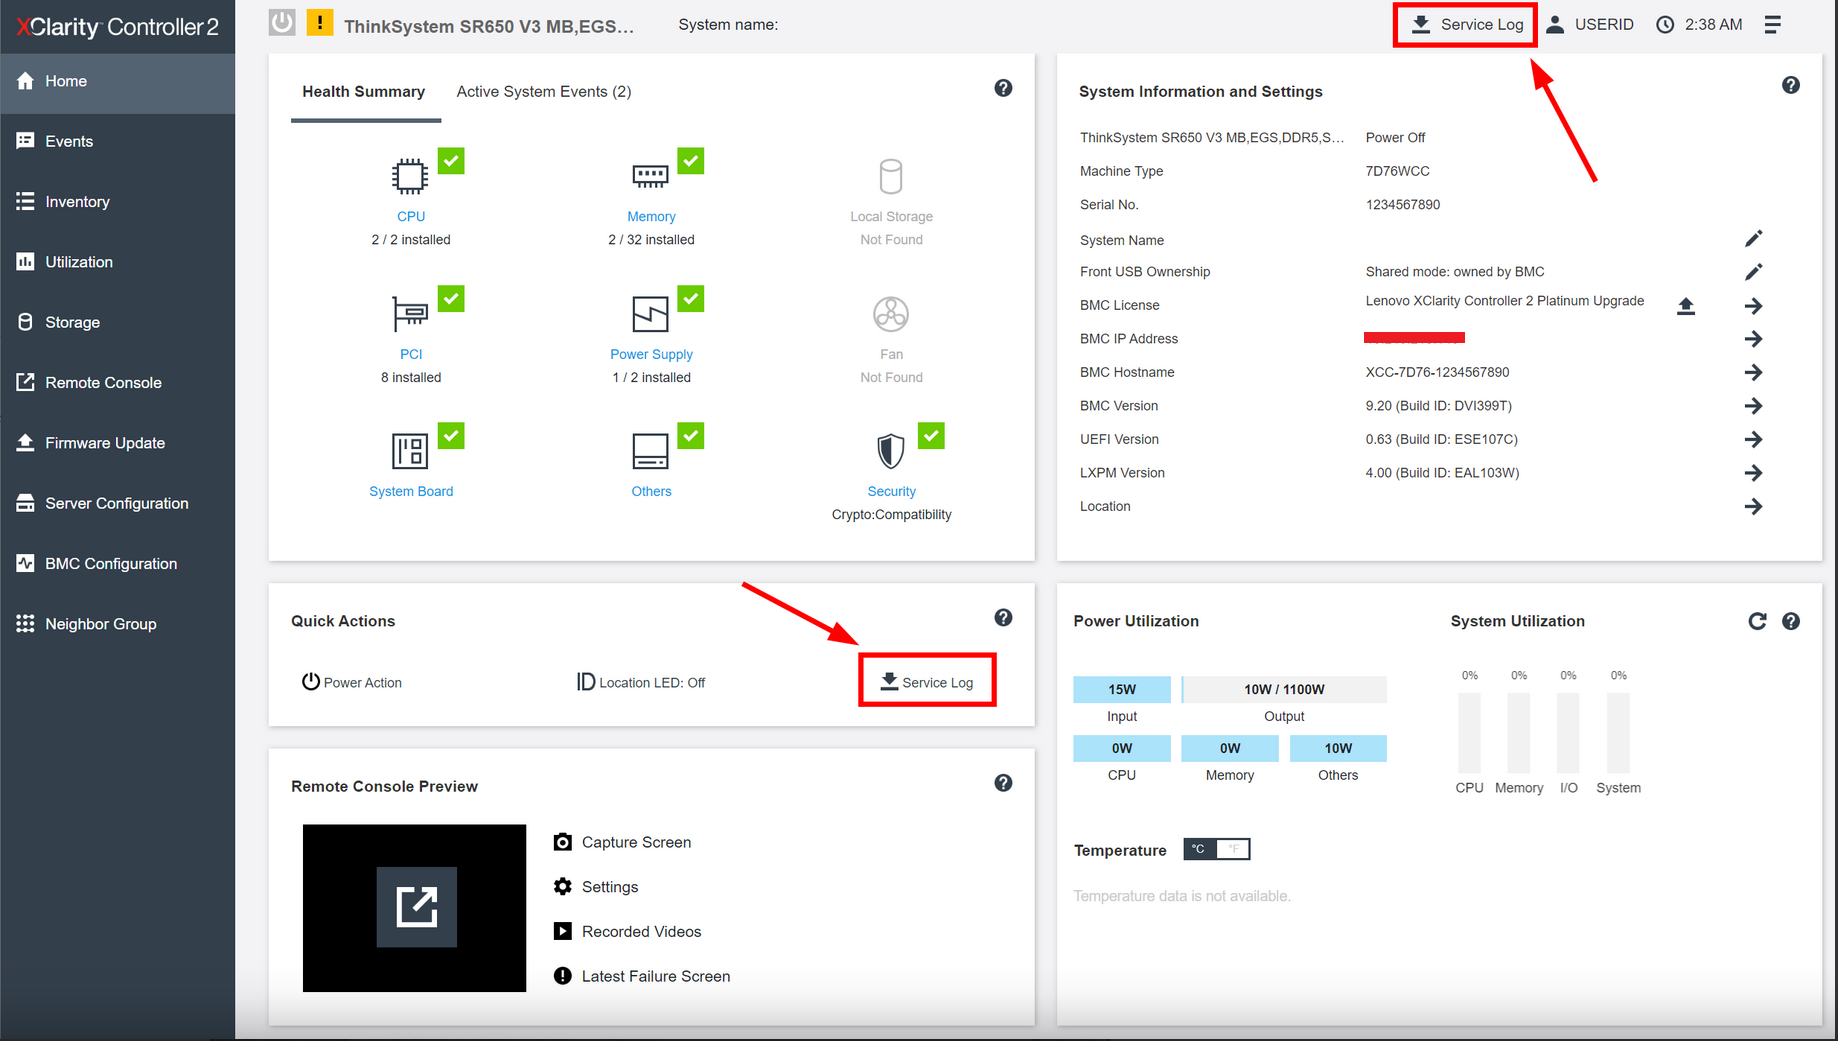
1,登录web管理界面。
2,在首页中,可以在顶部横幅或快速行动卡中找到Service Log按钮。不同版本XCC的web界面有一些不同,但差别不大。
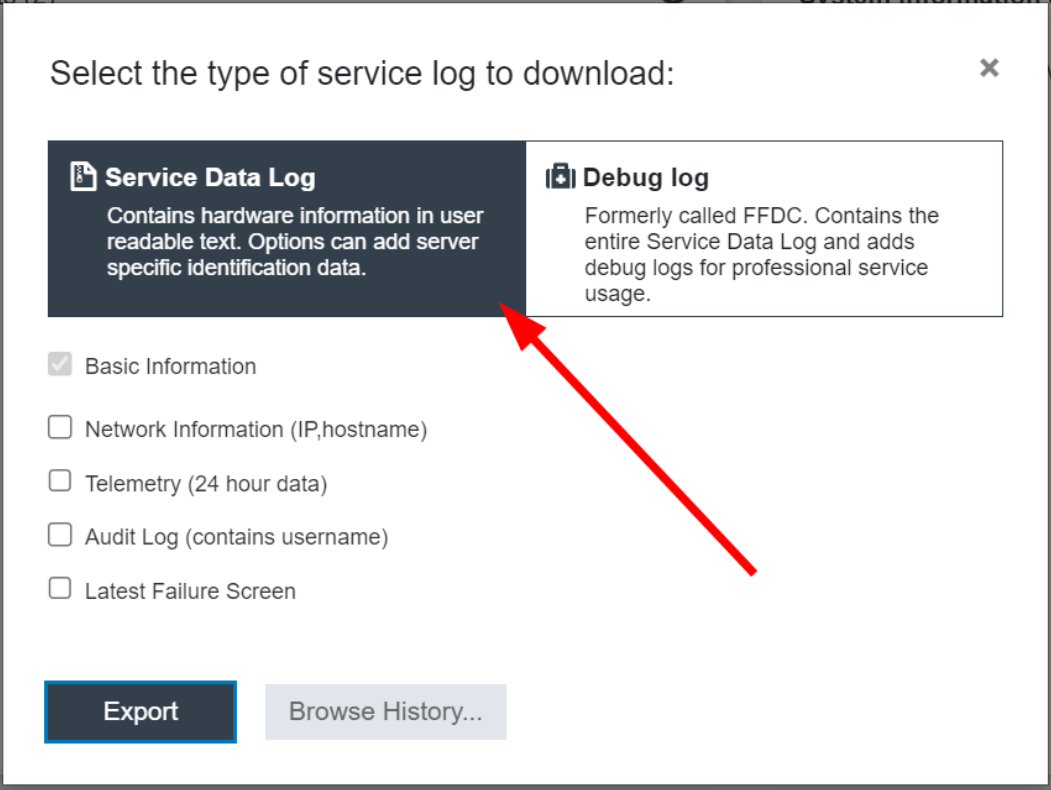
2,点击“Service Log”按钮后,会出现如下界面。日志会分为“Service Data Log”和“Debug log”两类。“Service Data Log”是一种用户友好型的日志,用户易读,体积较小的紧凑型日志文件。“Debug log”是最完整的服务器日志,通常在进行故障分析时,都需要提供“Debug log”。而“Service Data Log”通常用于日常统计或者服务器信息收集等用途。
注:对于V1/V2系列服务器,如果XCC固件比较旧,可能不会出现此界面,点击“Service Log”按钮后会自动收集最完整的日志。需要将XCC固件升级到最新来支持如下图的选择界面。
3,单击“Export”开始收集FFDC日志数据。等待一段时间后浏览器会提示您将文件下载保存到您的电脑上。
二、通过LXPM收集FFDC
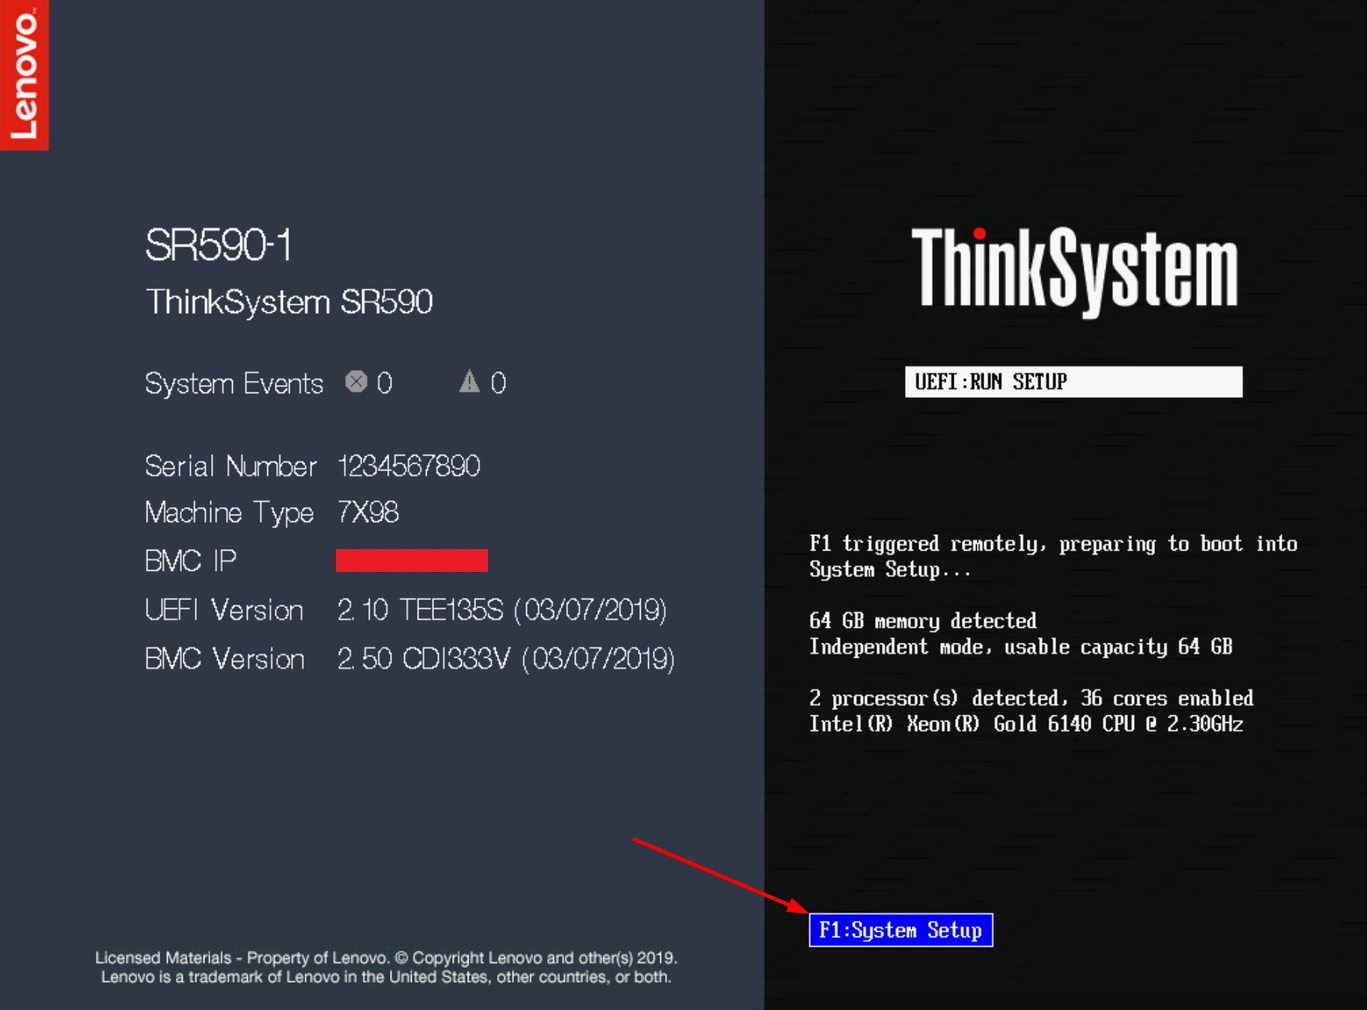
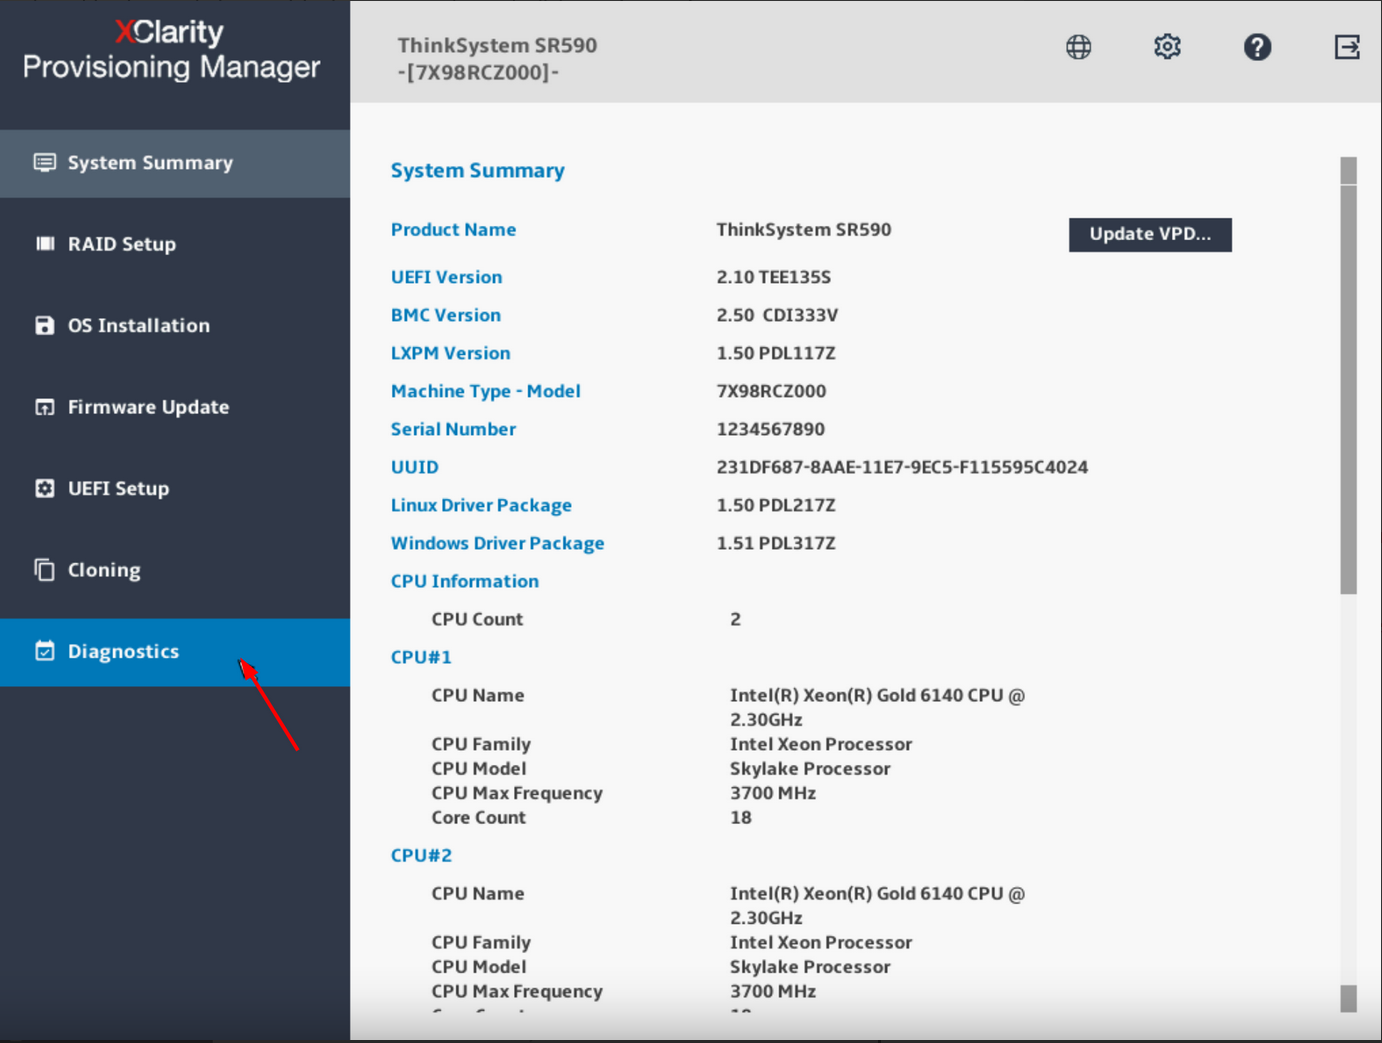
1,无论是LXPM V3还是LXPM V4,界面会有些区别,但是收集FFDC的步骤大致相同,首先需要在服务器启动时按提示按“F1”键进入到LXPM。
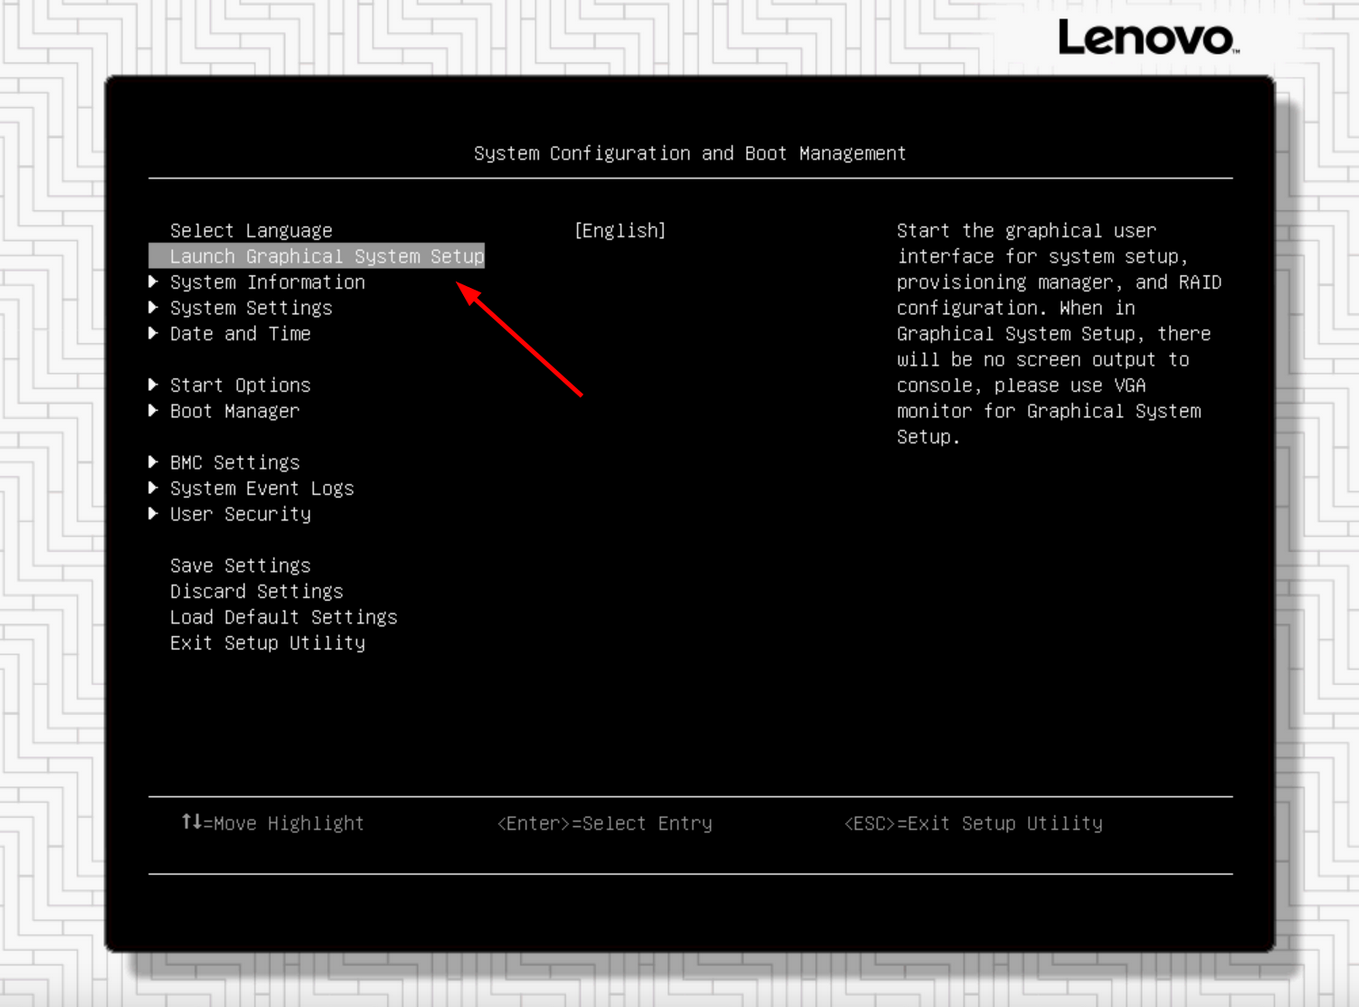
2,如果默认uEFI setup界面是文本模式,则需要选择 “Launch Graphical System Setup” 进入到图型界面。
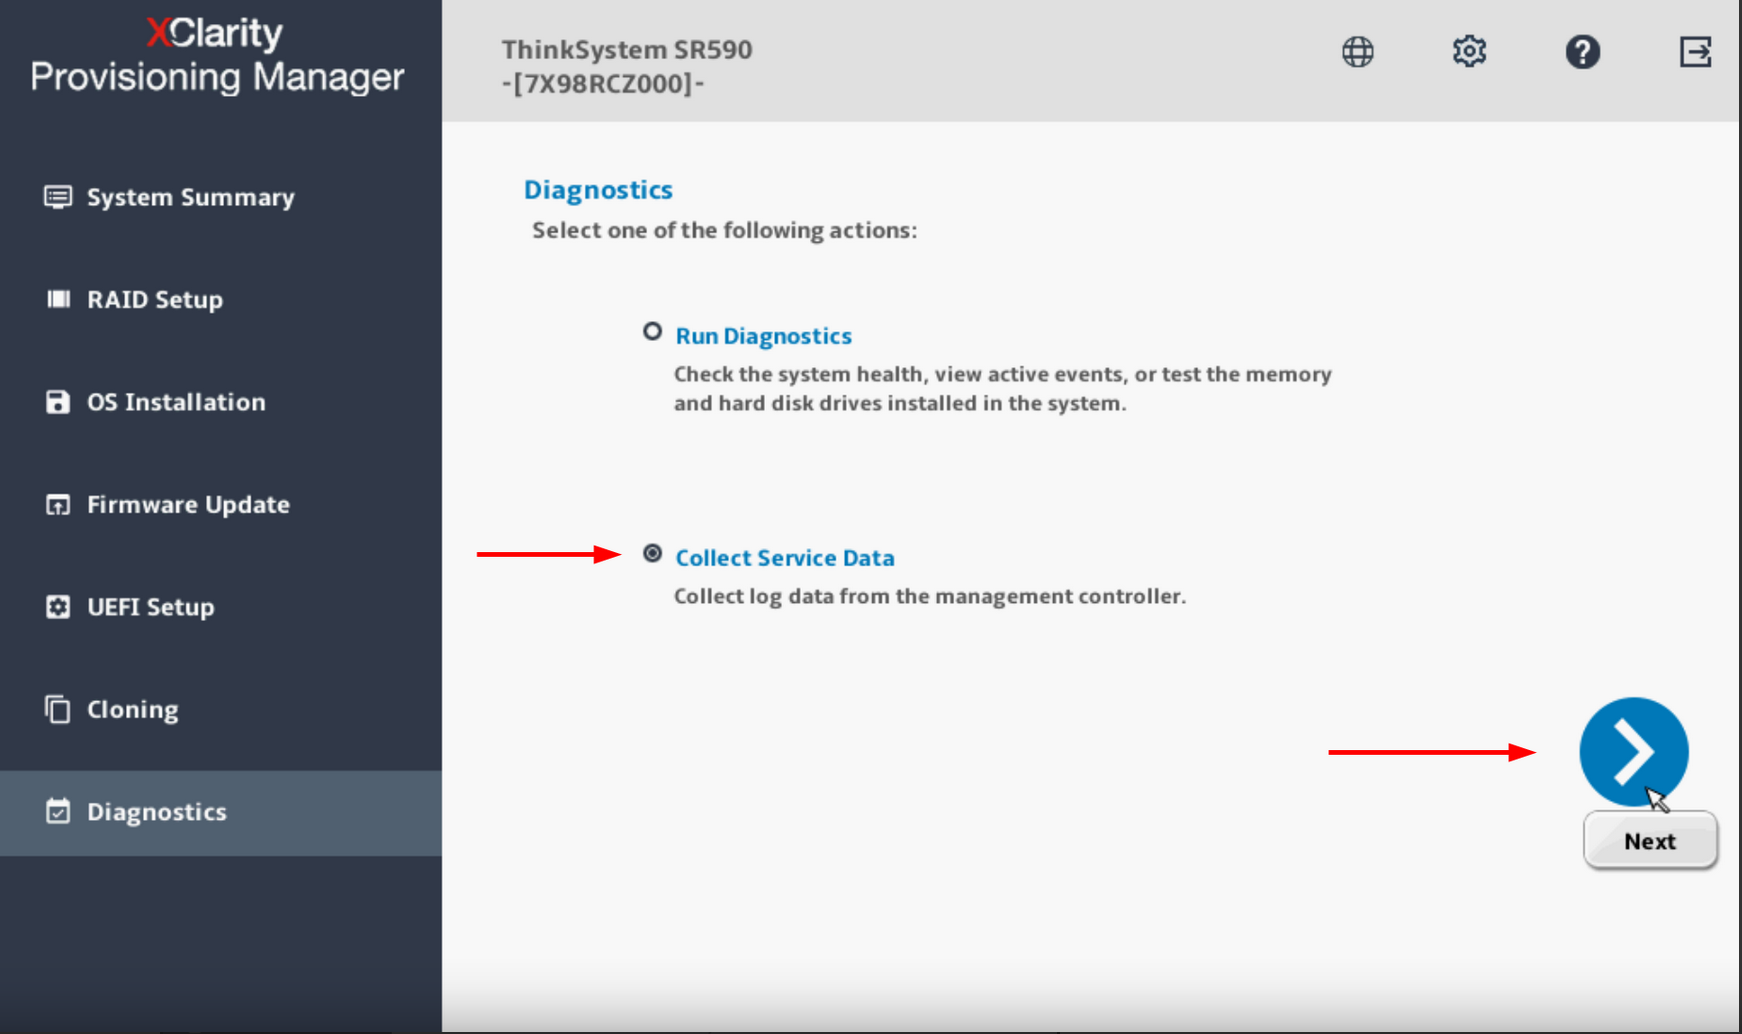
3,进入LXPM后,点击“Diagnostics”,然后按照提示收集FFDC日志,通常需要在服务器上插入一个U盘,用来将存放收集出来的日志。
三、通过LXCE OneCLI收集FFDC
如何通过OneCLI收集FFDC日志可参考本站往期文章
Lenovo XClarity Essentials - OneCLI使用指南
四、通过LXCA收集FFDC
Lenovo XClarity Administrator(LXCA)部署指南(1)
Lenovo XClarity Administrator(LXCA)部署指南(2)
Lenovo XClarity Administrator(LXCA)部署指南(3)
Lenovo XClarity Administrator(LXCA)部署指南(4)
Lenovo XClarity Administrator(LXCA)部署指南(5)
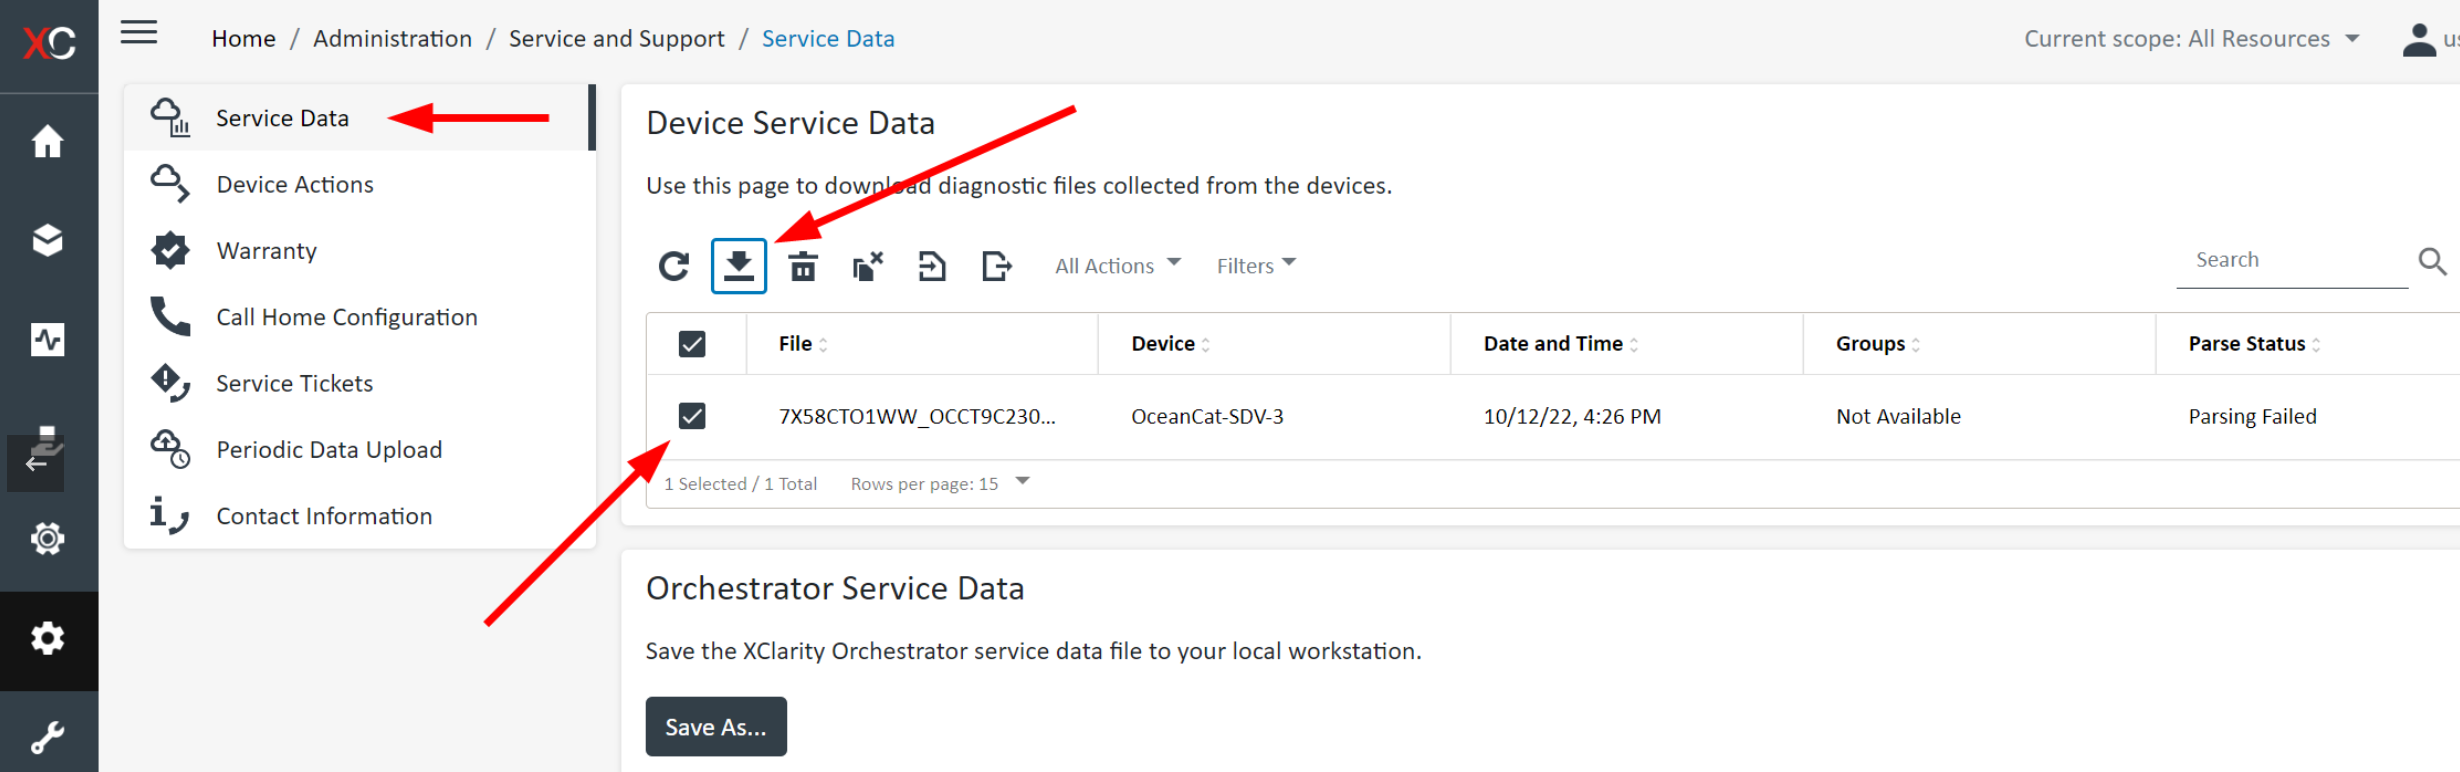
五、通过XClarity Orchestrator收集FFDC
1,登录到 XClarity Orchestrator 管理界面.
2,依次点击 Administration > Service and Support > Device Actions.
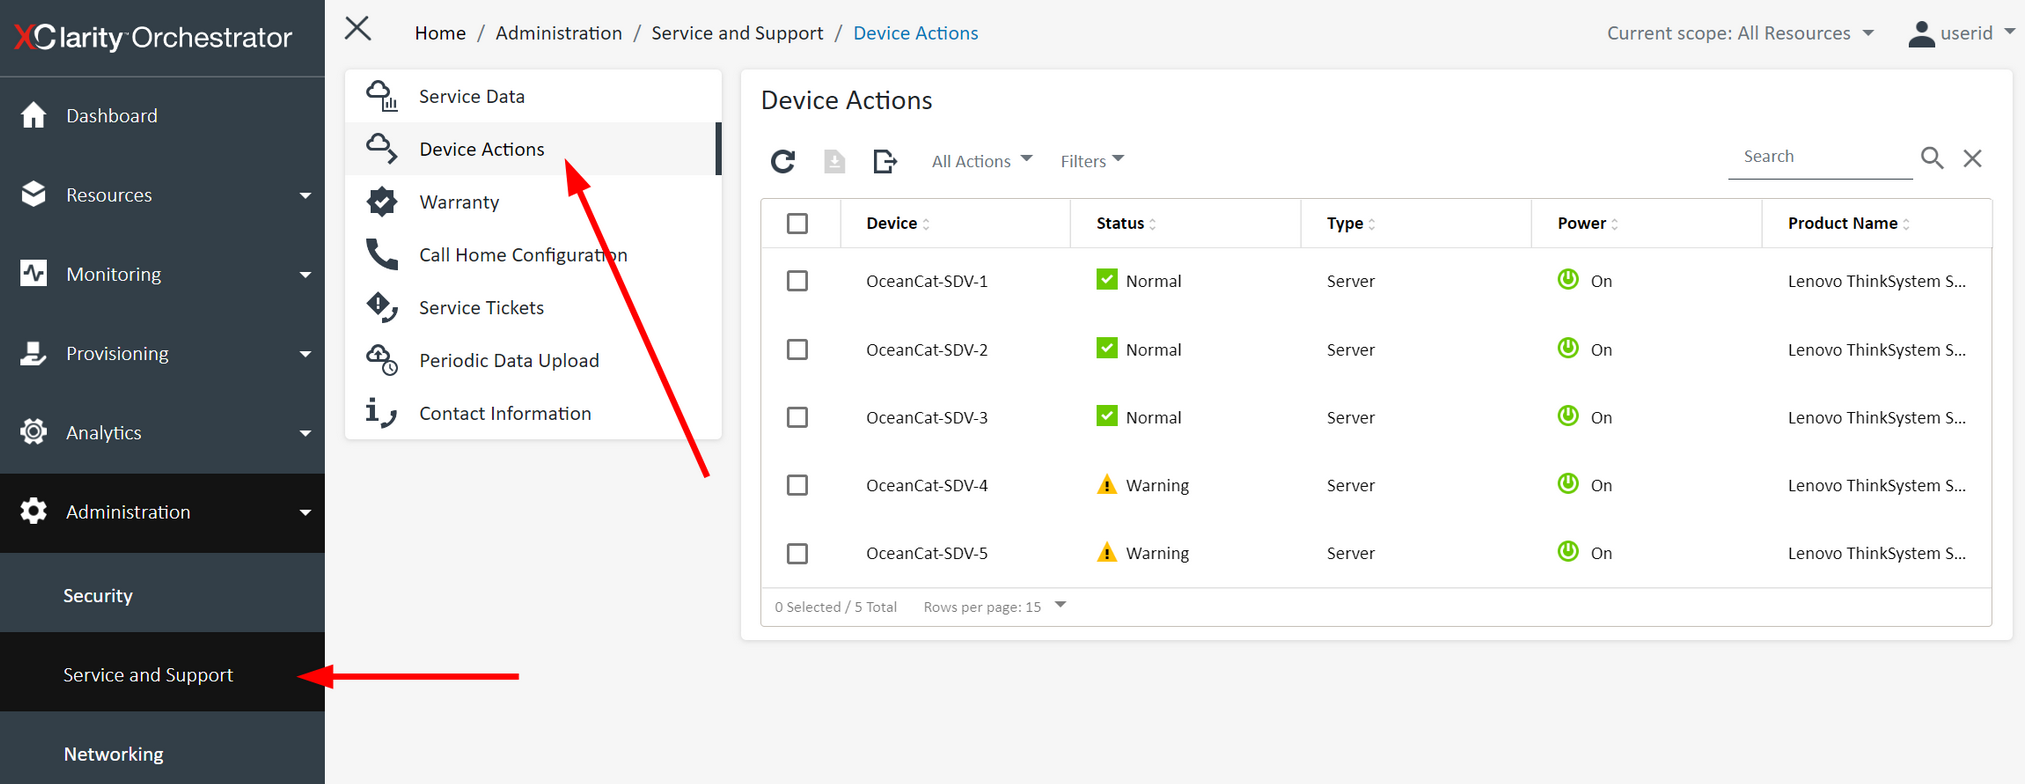
3,选择需要收集FFDC日志的服务器,可以多选。然后单击工具栏上的按钮开始收集。
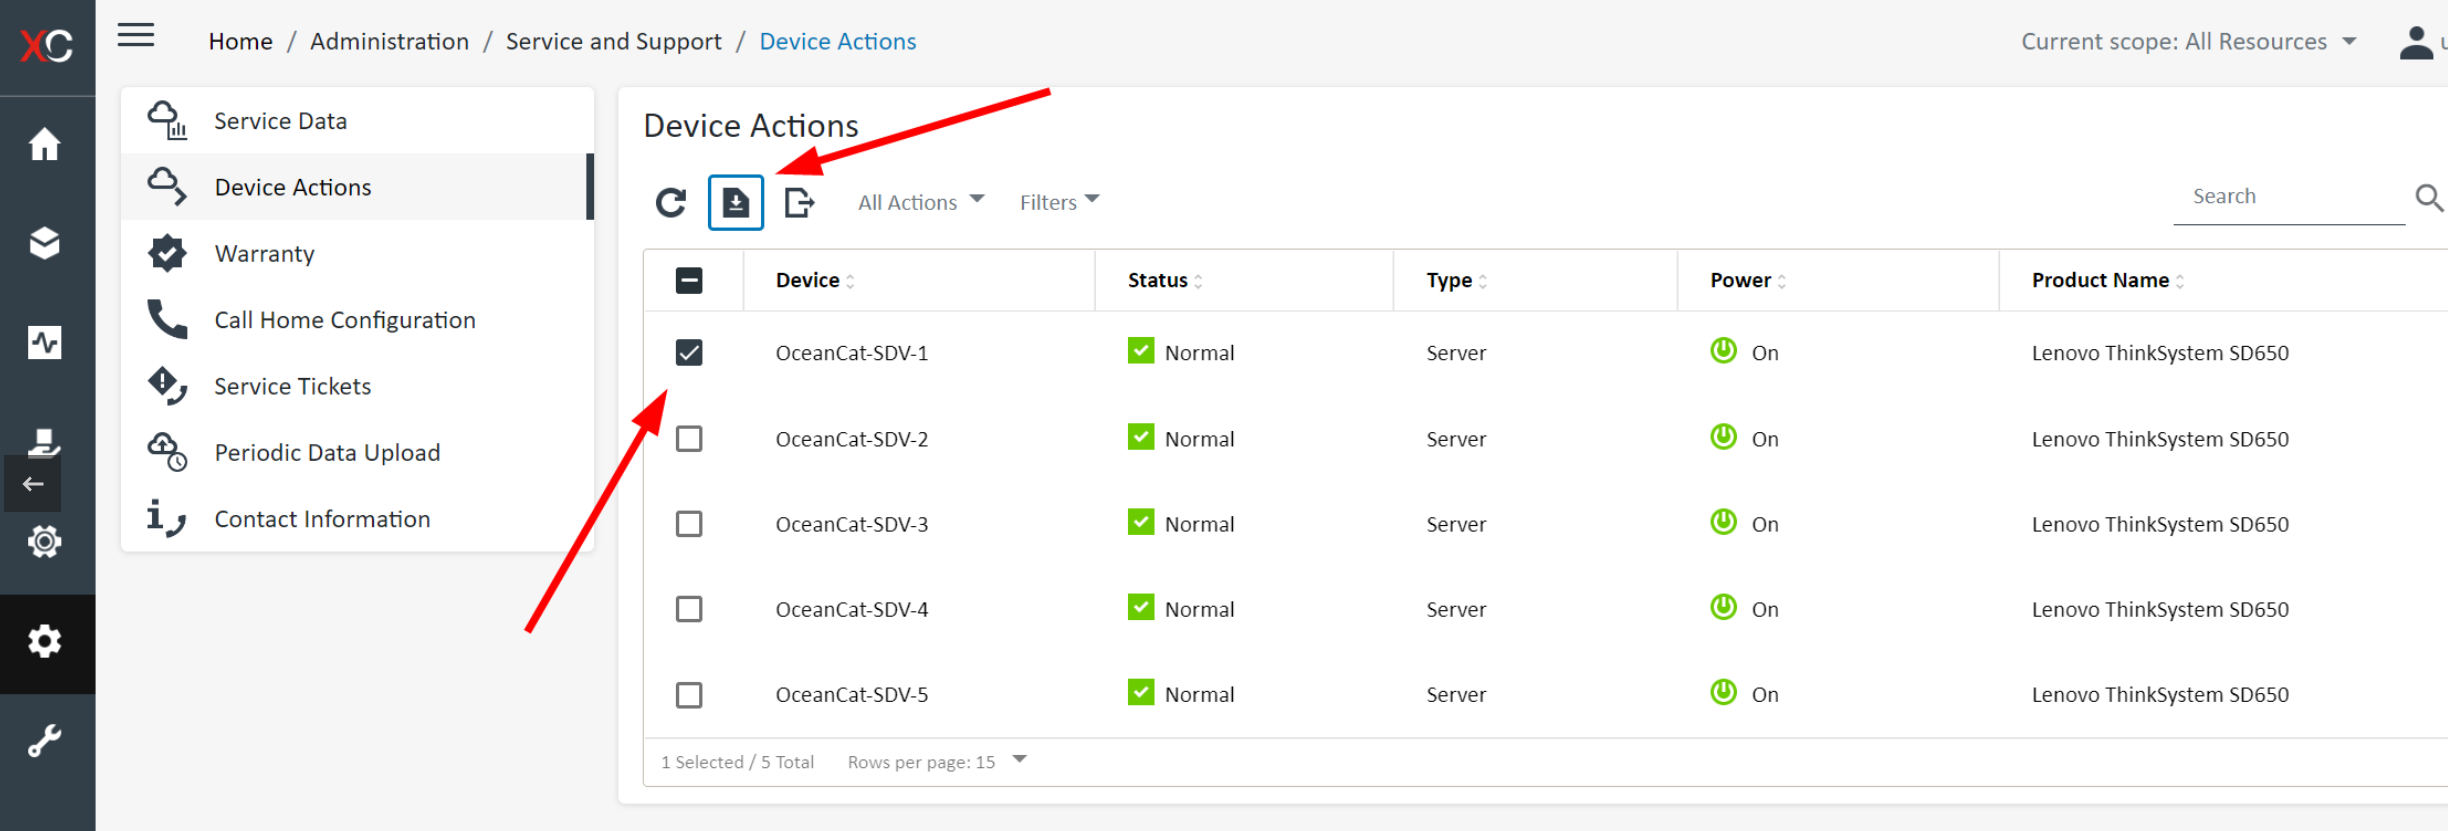
4,收集完成后,点击“Service Data”,选择收集好的FFDC日志文件,然后单击工具栏上的按钮将日志下载到本地。
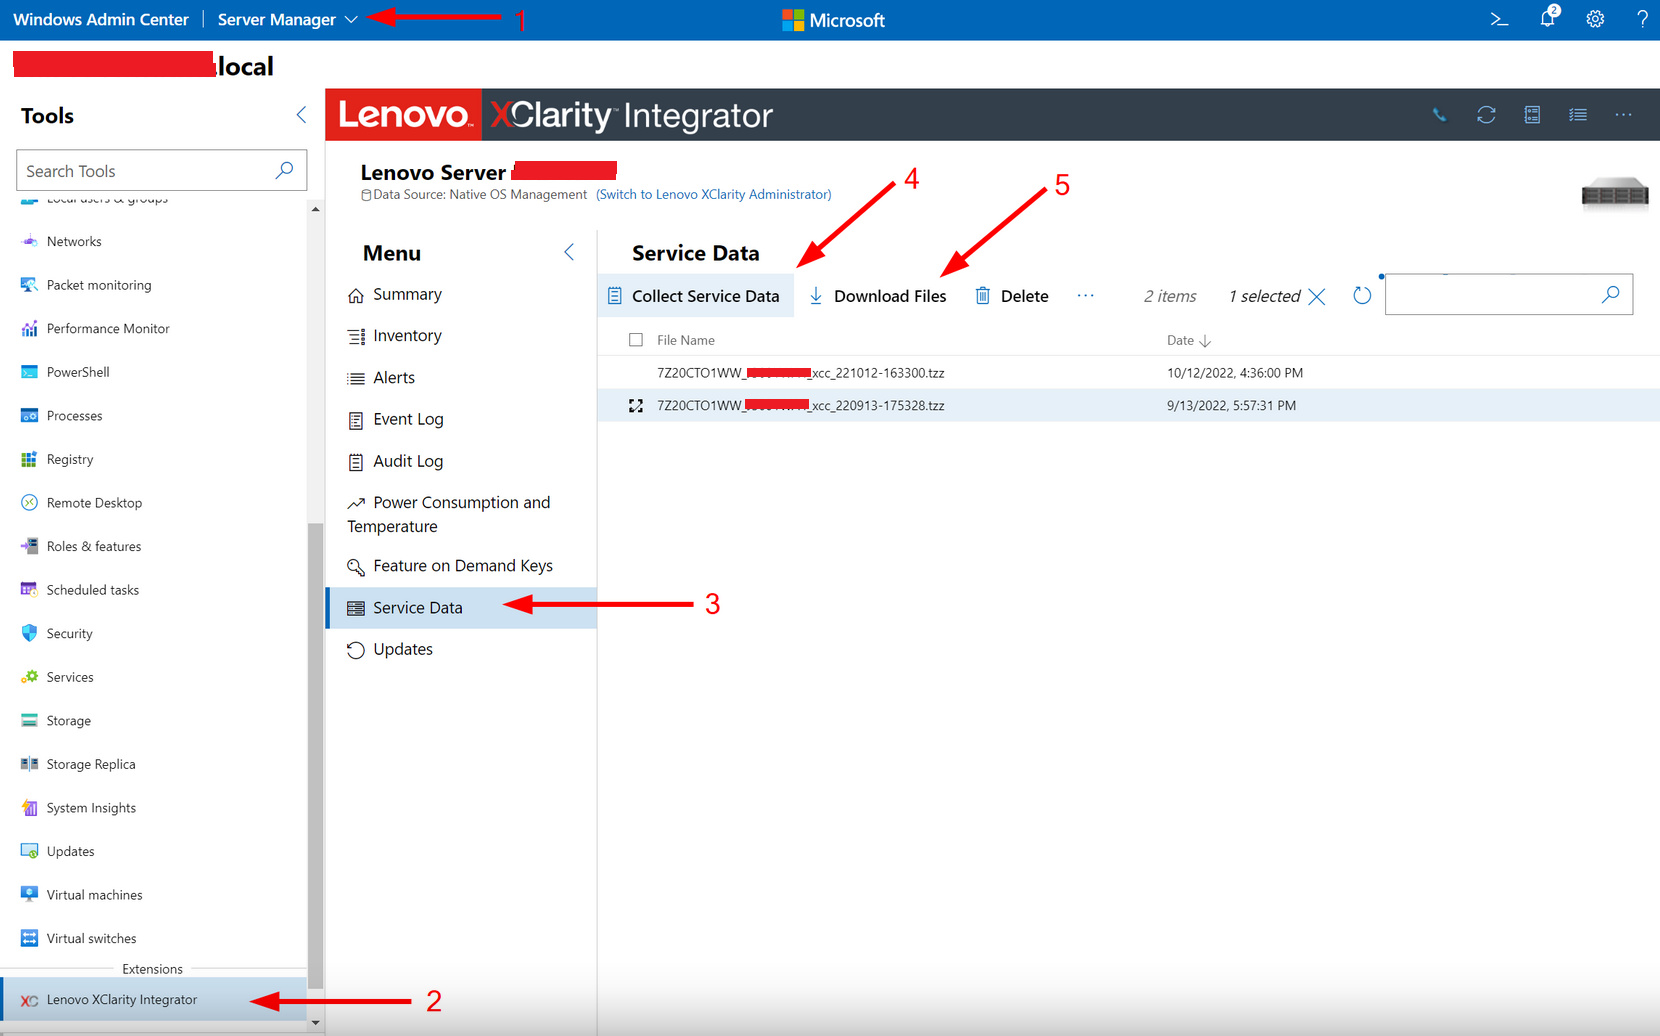
六、通过LXCI-WAC收集FFDC
1,登录到 Windows Admin Center,然后选择服务器管理器视图,并选择您需要收集FFDC日志的服务器。
2,在左侧导航栏中找到 Lenovo XClarity Integrator。
3,在 XClarity Integrator页面中,导航到Service Data页面。
4,单击 Collect Service Data 按钮开始收集FFDC日志。
5,单机 Download Files 将FFDC日志下载到本地。
七、通过XClarity Mobile app收集FFDC
备注:
1,可以通过 Google Play 商店或者 Apple Store 下载 XClarity Mobile app。
2,XClarity Mobile应用程序可以用作XClarity Administraotor服务器的客户端。它可以查看所有被管理的设备状态和库存,接收警报,采取电源操作,并收集服务数据。
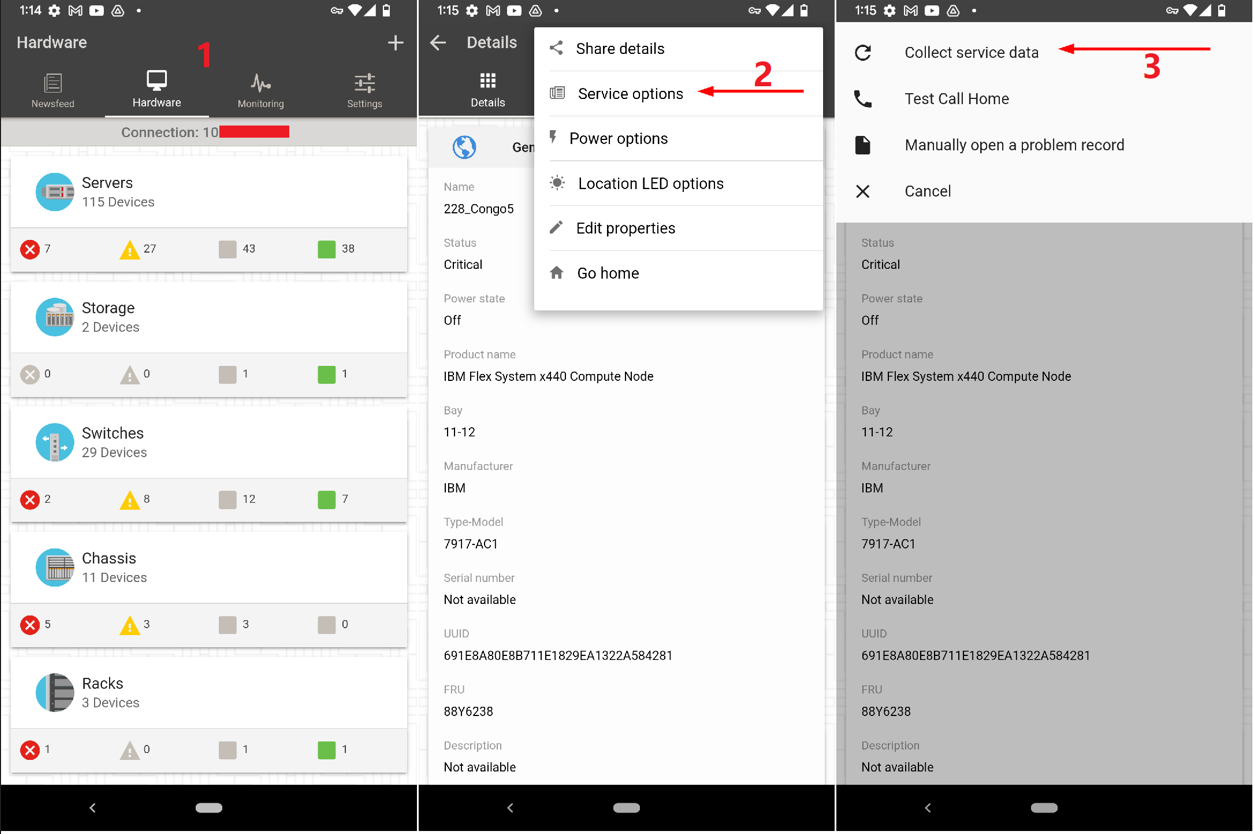
7.1 将LXCM做为LXCA的客户端来收集FFDC日志
1,启动LXPM App 然后点击 “Hardware”。
2,选择 “Service options”, 然后选择 “Collect service data”。
3,FFDC收集完成后,可在LXCA控制台中查看并下载FFDC日志。
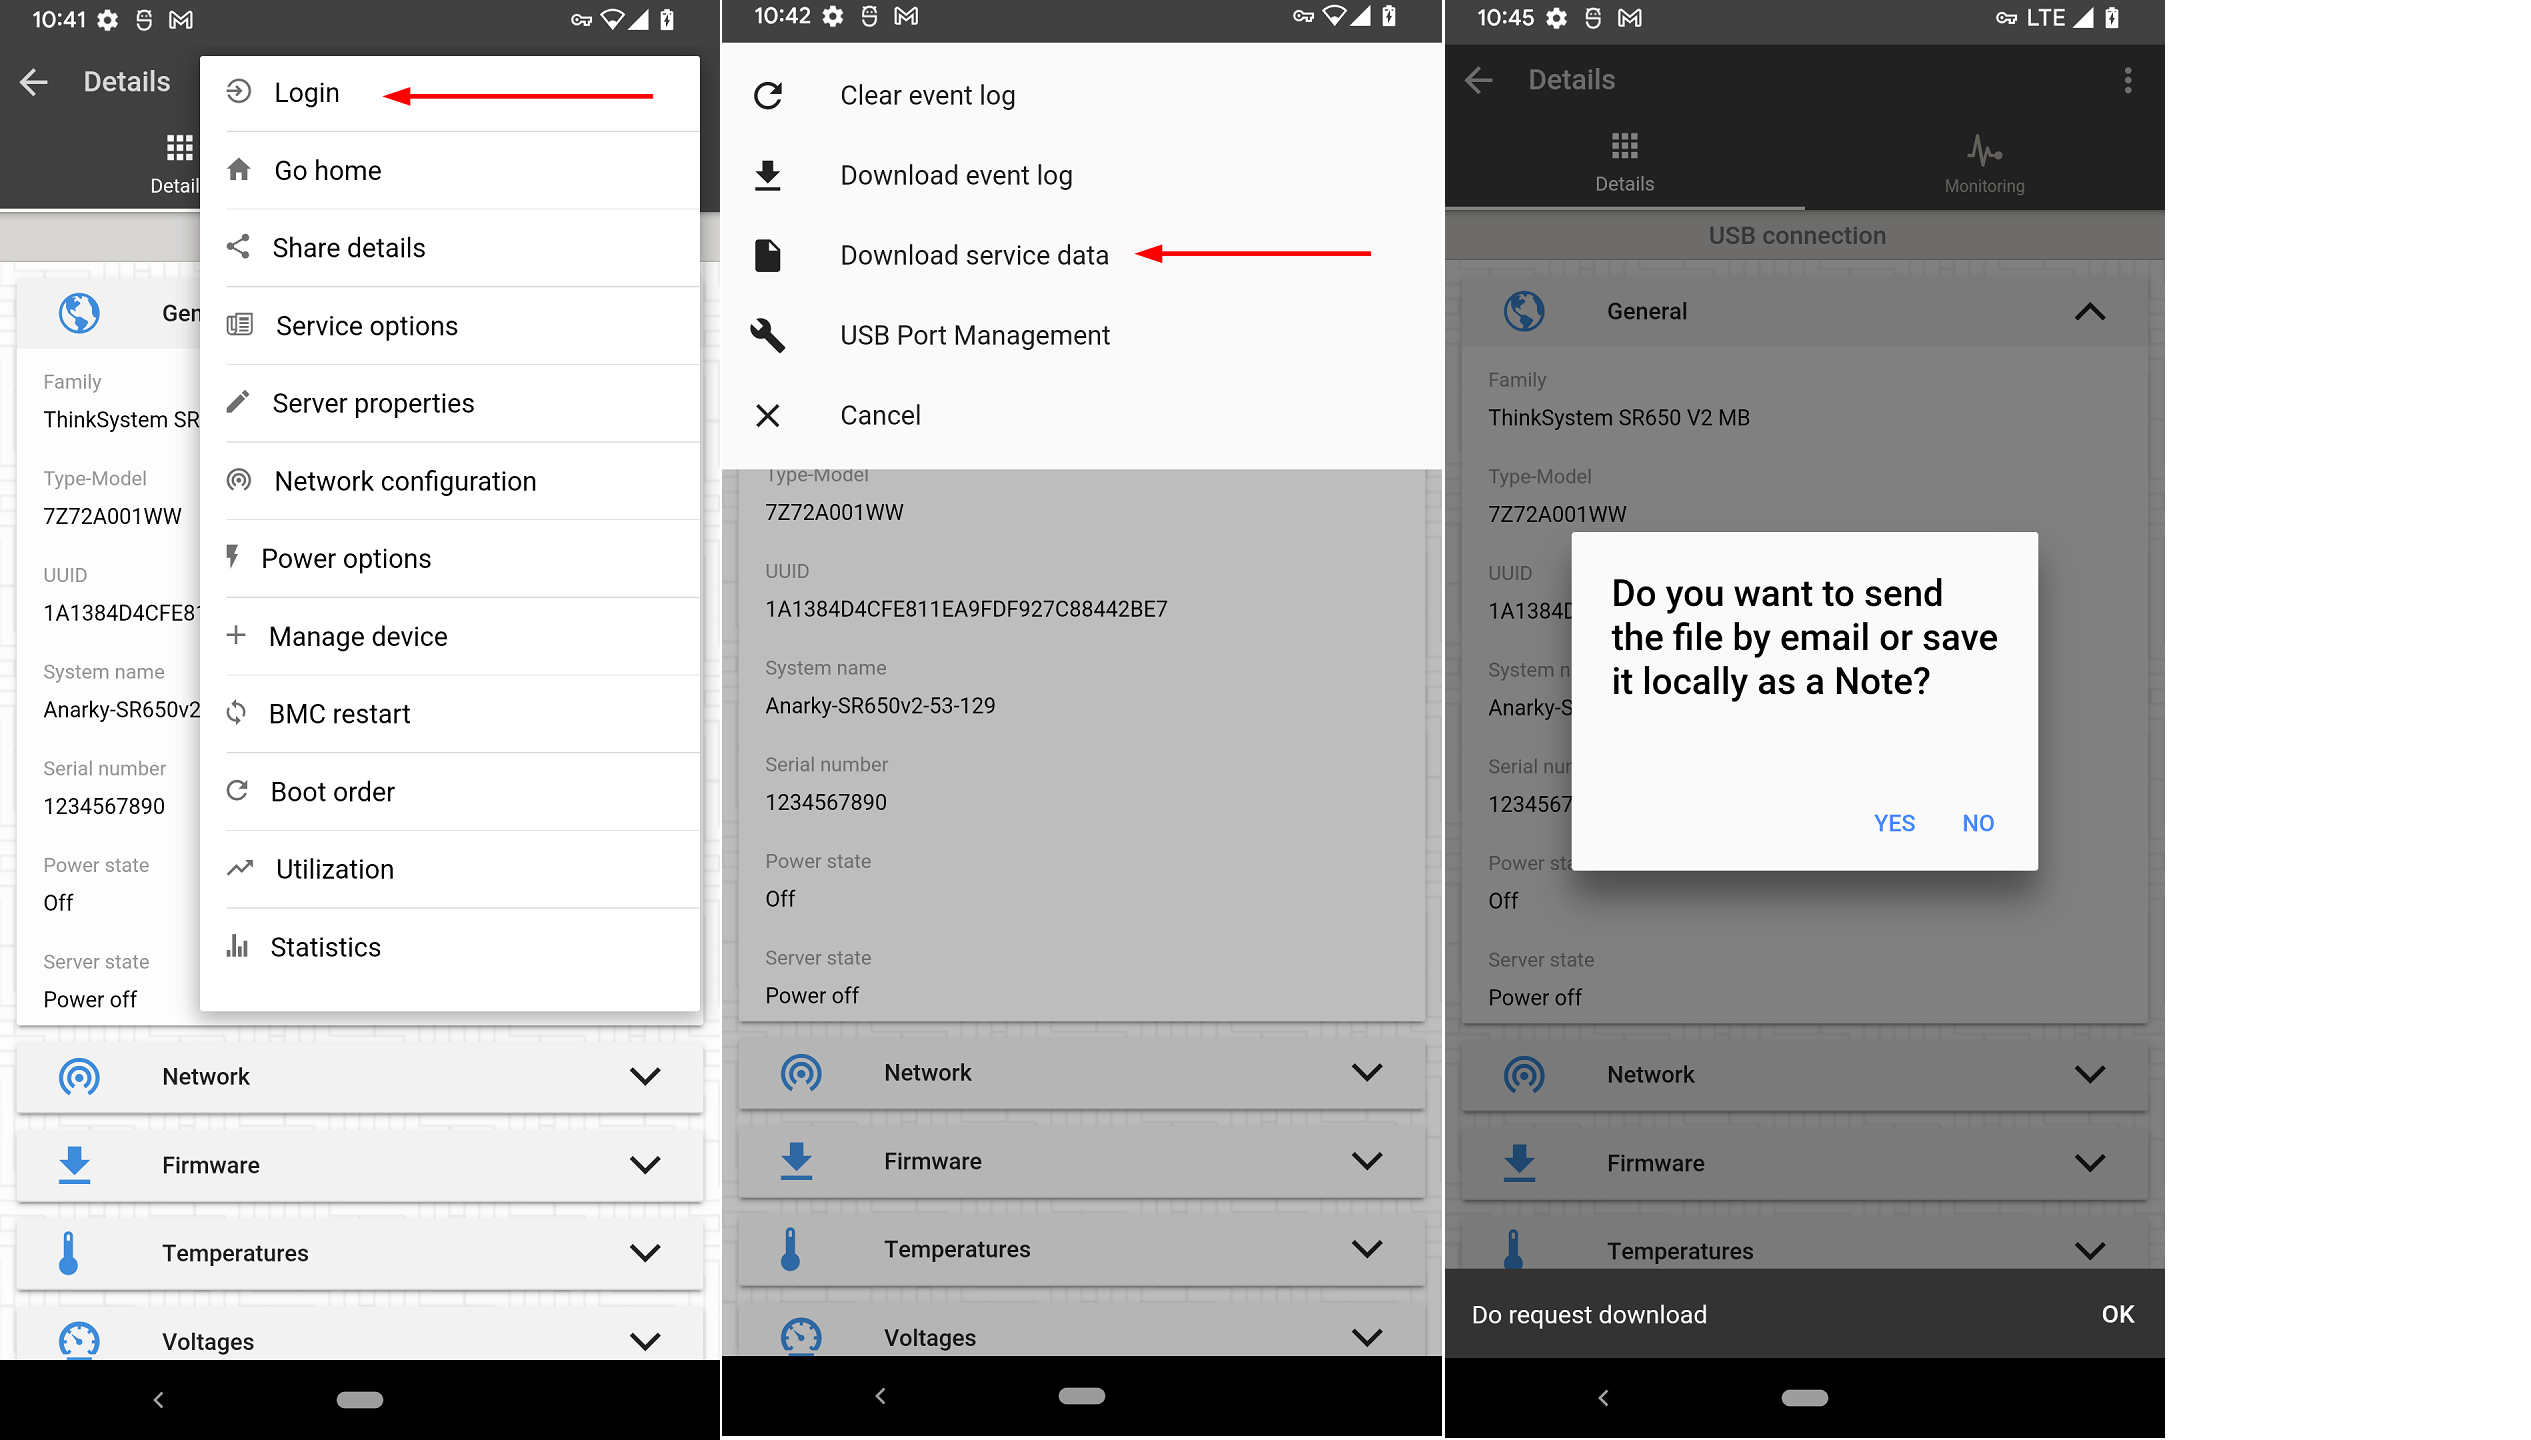
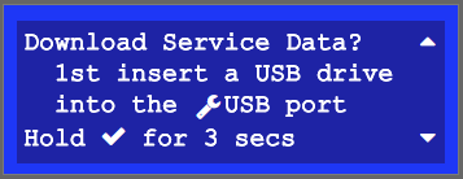
7.2 通过LXCM连接服务器USB端口收集FFDC日志
1,启动LXPM App 然后点击 USB 图标。
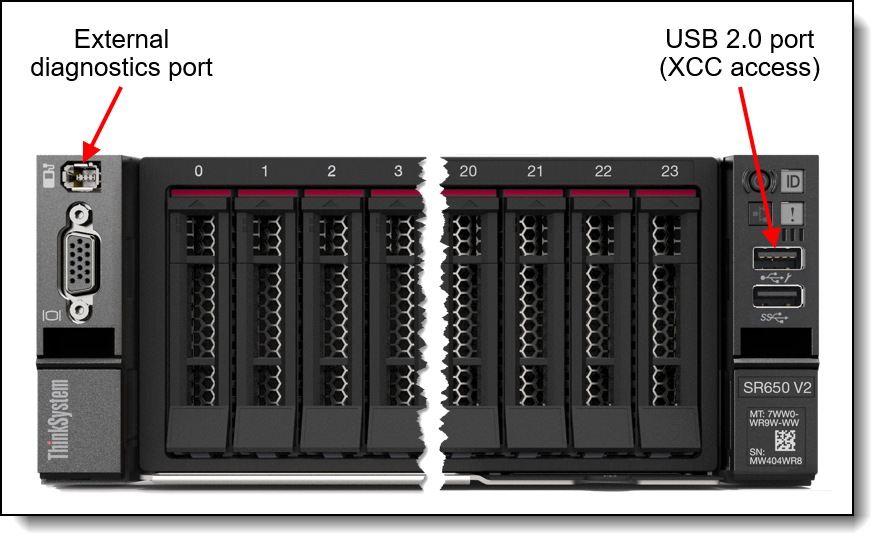
2,将手机连接到服务器前端管理USB端口(带有扳手标志的端口),在手机操作系统设置上启用USB tethering(捆绑)(如果还没有做的话)。移动端app不断验证连接和设置,直到满足(通过勾选标记表示)。
3,点击 “Discover”,在底部将会提示 “USB connected”,展开它以选择发现的服务器。
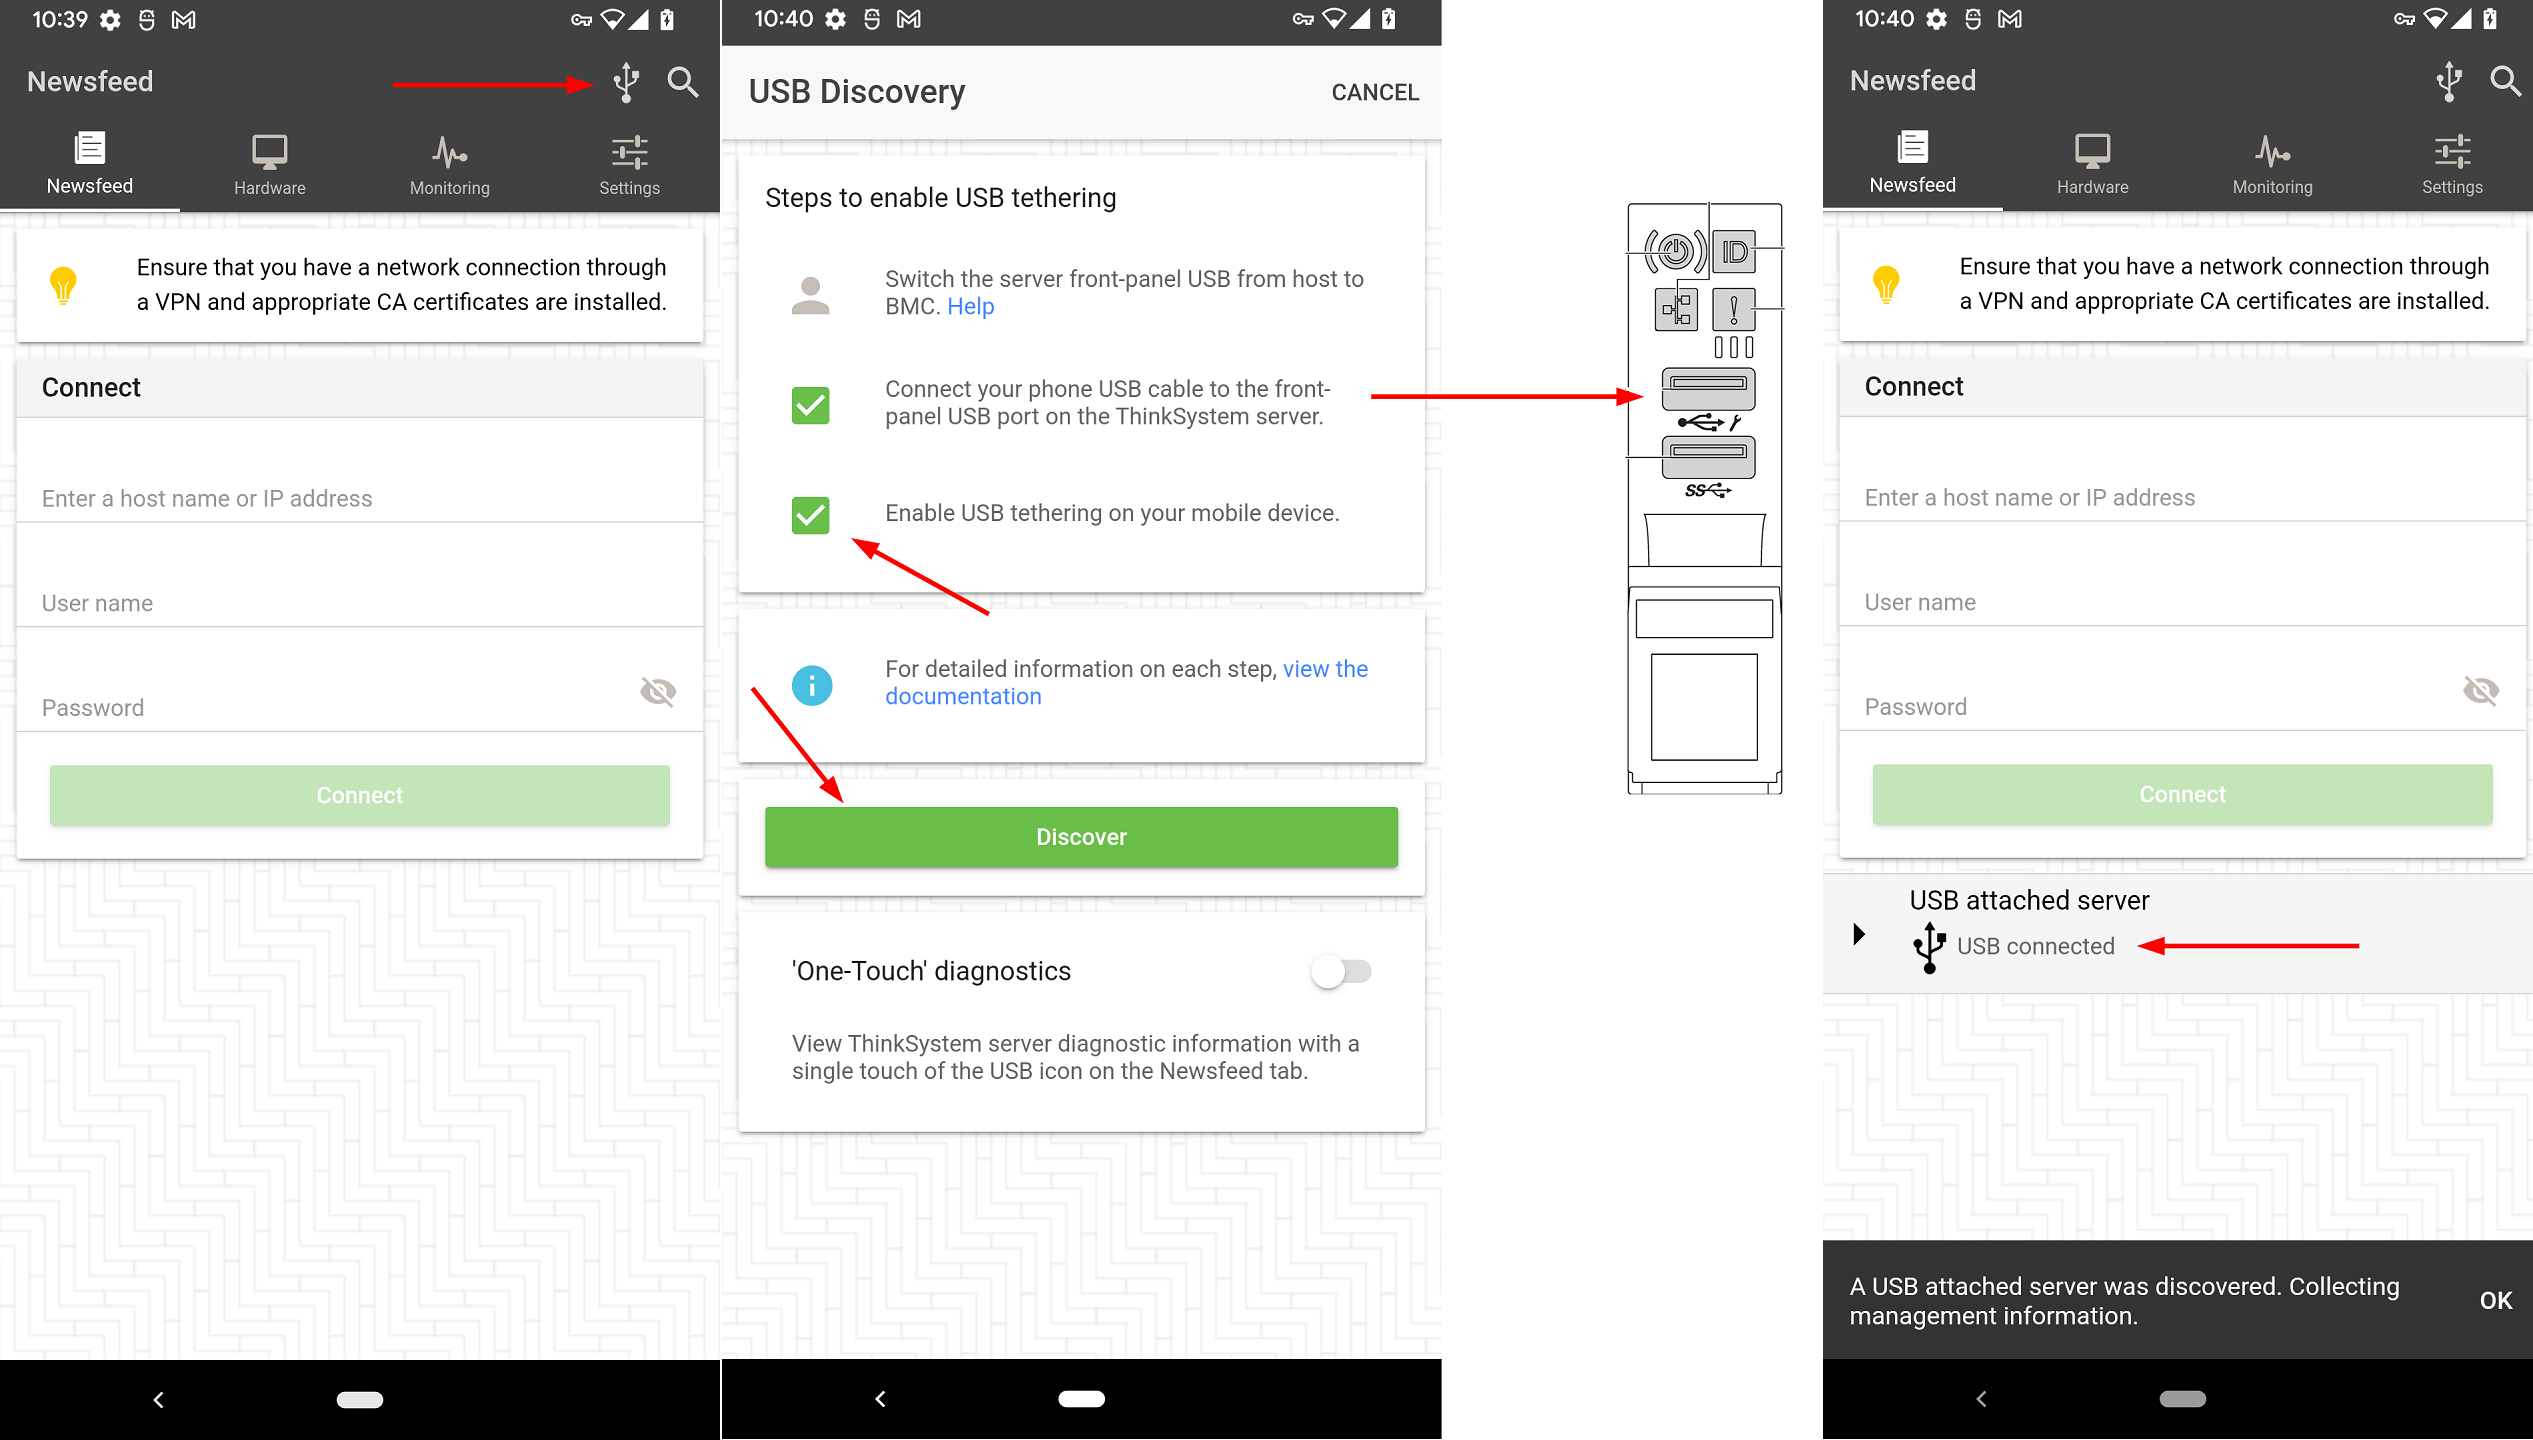
4,进入服务器后,打开右上角选项菜单,选择“登录”。输入服务器的XClarity控制器登录凭据(例如USERID / xxx)。
5,登录成功后,选择“Service options”,然后选择 “Download service data” 下载FFDC日志。对确认提示回答Yes。
八、通过内置诊断面板或外置诊断工具收集FFDC
备注:
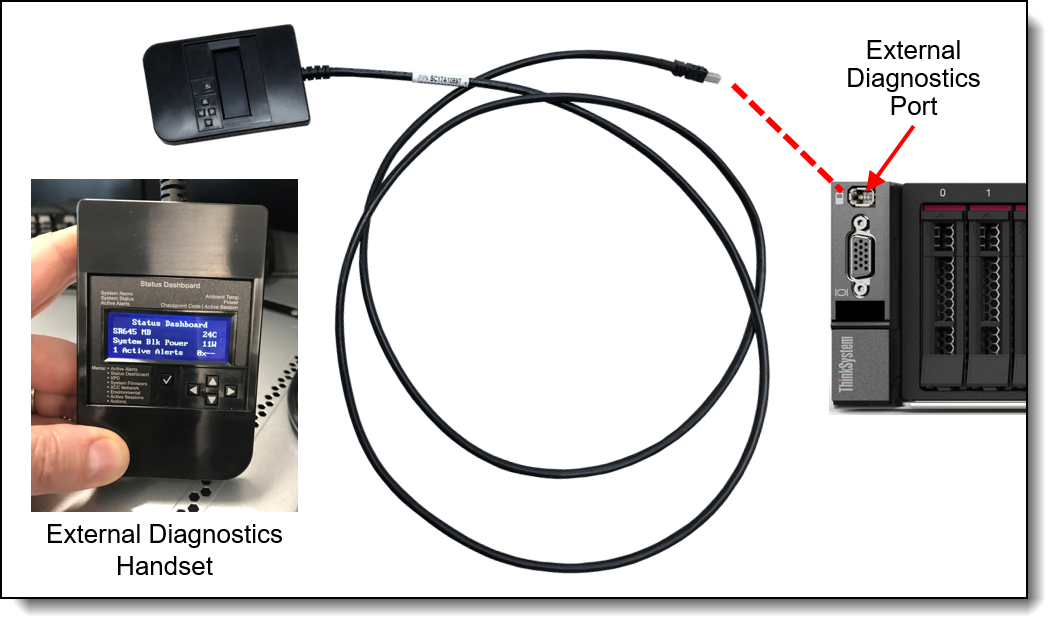
对于配备有外部诊断连接器接口或内置诊断面板的ThinkSystem服务器,你可以使用它来收集服务数据。它使您能够收集调试日志并将文件写入USB存储设备。在向USB存储设备写入文件时,需要将设备格式化为FAT、FAT32或exFAT,并插入服务器前端的XCC控制USB接口。
1,将U盘连接到XCC控制的USB接口(带有扳手图标)。
2,连接外部诊断手持设备到外部诊断连接器。对于内置诊断面板的机型,只需将其拉出即可。
3,滚动到Actions菜单,然后生成/下载FFDC日志。
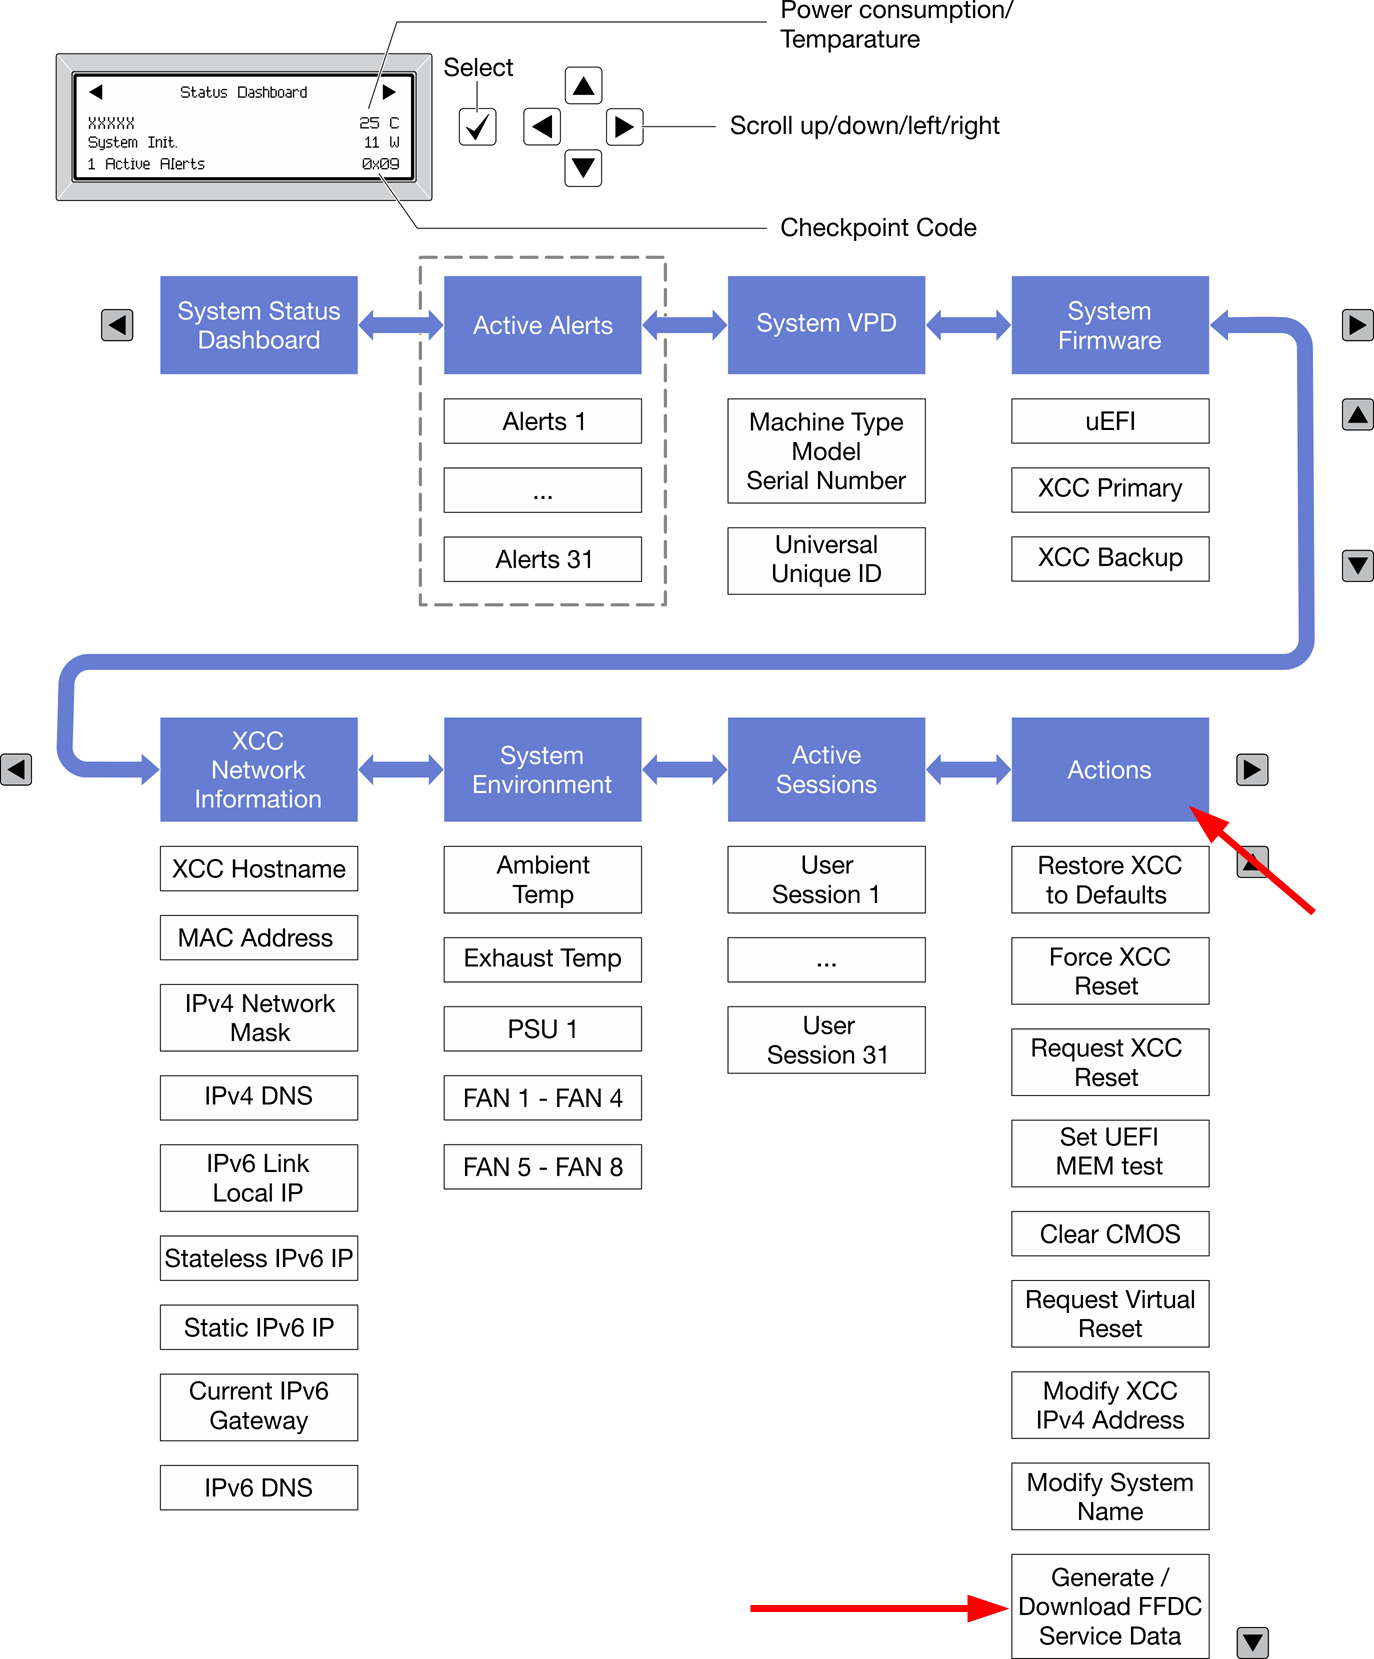
4,按照屏幕上的提示保存FFDC到U盘。
九、通过Redfish API LogServices收集FFDC
参考资料: https://pubs.lenovo.com/xcc2-restapi/collect_bmc_diagnostic_data_post
1,执行以下命令
curl -L -s -k -u USERID:PASSW0RD -X POST 'https://192.168.70.125/redfish/v1/Systems/1/LogServices/DiagnosticLog/Actions/LogService.CollectDiagnosticData' -H 'Content-Type: application/json' --data '{"DiagnosticDataType" : "Manager"}' | jq

Response:
{
    "TaskMonitor": "/redfish/v1/TaskService/f152fee2-1877-41ab-8614-3e7010dc5adb",
    "@odata.etag": "\"1708987633087\"",
    "Description": "This resource represents a task for a Redfish implementation.",
    "Messages": [],
    "HidePayload": true,
    "@odata.id": "/redfish/v1/TaskService/Tasks/9bceab02-d75e-441d-9fc7-cc4cecc96558",
    "StartTime": "2024-04-06T22:47:13+00:00",
    "@odata.context": "/redfish/v1/$metadata#Task.Task",
    "Id": "9bceab02-d75e-441d-9fc7-cc4cecc96558",
    "Name": "Task 9bceab02-d75e-441d-9fc7-cc4cecc96558",
    "@odata.type": "#Task.v1_6_1.Task",
    "TaskState": "New"
}
2,检索任务状态,正在运行。
curl -L -s -k -u USERID:PASSW0RD -X GET 'https://192.168.70.125/redfish/v1/TaskService/Tasks/9bceab02-d75e-441d-9fc7-cc4cecc96558' | jq

Response:
{
    "TaskMonitor": "/redfish/v1/TaskService/f152fee2-1877-41ab-8614-3e7010dc5adb",
    "@odata.etag": "\"1708987633158\"",
    "Description": "This resource represents a task for a Redfish implementation.",
    "Messages": [],
    "HidePayload": true,
    "TaskState": "Running",
    "StartTime": "2024-04-06T22:47:13+00:00",
    "@odata.context": "/redfish/v1/$metadata#Task.Task",
    "Id": "9bceab02-d75e-441d-9fc7-cc4cecc96558",
    "Name": "Task 9bceab02-d75e-441d-9fc7-cc4cecc96558",
    "@odata.type": "#Task.v1_6_1.Task",
    "@odata.id": "/redfish/v1/TaskService/Tasks/9bceab02-d75e-441d-9fc7-cc4cecc96558"
}
3,检索任务状态,FFDC收集完毕。
{
    "EndTime": "2024-04-06T22:48:05+00:00",
    "TaskMonitor": "/redfish/v1/TaskService/f152fee2-1877-41ab-8614-3e7010dc5adb",
    "@odata.etag": "\"1708987685412\"",
    "Description": "This resource represents a task for a Redfish implementation.",
    "TaskState": "Completed",
    "Messages": [
        {
            "MessageArgs": [],
            "@odata.type": "#Message.v1_1_2.Message",
            "MessageId": "Base.1.14.Success",
            "Message": "The request completed successfully.",
            "MessageSeverity": "OK",
            "Resolution": "None"
        },
        {
            "MessageArgs": ["FFDC"],
            "@odata.type": "#Message.v1_1_2.Message",
            "MessageId": "LogService.1.0.DiagnosticDataCollected",
            "Message": "'FFDC' diagnostic data collected.",
            "MessageSeverity": "OK",
            "Resolution": "None."
        }
    ],
    "HidePayload": true,
    "StartTime": "2024-04-06T22:47:13+00:00",
    "TaskStatus": "OK",
    "@odata.context": "/redfish/v1/$metadata#Task.Task",
    "Id": "9bceab02-d75e-441d-9fc7-cc4cecc96558",
    "Name": "Task 9bceab02-d75e-441d-9fc7-cc4cecc96558",
    "@odata.type": "#Task.v1_6_1.Task",
    "@odata.id": "/redfish/v1/TaskService/Tasks/9bceab02-d75e-441d-9fc7-cc4cecc96558"
}
4,找到生成的FFDC日志文件的位置。
curl -L -s -k -u USERID:PASSW0RD -X GET 'https://192.168.70.125/redfish/v1/Systems/1/LogServices/DiagnosticLog/Entries' | jq

Response:
{
    "Description": "A collection of DiagnosticLogEntry resource instances.",
    "Members@odata.count": 3,
    "@odata.id": "/redfish/v1/Systems/1/LogServices/DiagnosticLog/Entries",
    "@odata.context": "/redfish/v1/$metadata#LogEntryCollection.LogEntryCollection",
    "@odata.etag": "\"b99a3f5cb05232c73e0e1\"",
    "Name": "DiagnosticLogEntryCollection",
    "@odata.type": "#LogEntryCollection.LogEntryCollection",
    "Members": [
        {
            "EntryType": "Oem",
            "OemRecordFormat": "Lenovo",
            "AdditionalDataSizeBytes": 18458411,
            "Description": "This resource is used to represent a log entry for log services for a Redfish implementation.",
            "Created": "2024-04-06T22:48:00+00:00",
            "DiagnosticDataType": "Manager",
            "AdditionalDataURI": "/imm_dump/FFDC/7D75_J1111111_xcc_240406-224717.tzz",
            "@odata.etag": "\"3bf9b21a8f3d27e8a1d\"",
            "@odata.context": "/redfish/v1/$metadata#LogEntry.LogEntry",
            "Id": "FFDC",
            "Name": "FFDC",
            "@odata.type": "#LogEntry.v1_13_0.LogEntry",
            "@odata.id": "/redfish/v1/Systems/1/LogServices/DiagnosticLog/Entries/FFDC"
        },
        {
            "EntryType": "Oem",
            "OemRecordFormat": "Lenovo",
            "AdditionalDataSizeBytes": 0,
            "Description": "This resource is used to represent a log entry for log services for a Redfish implementation.",
            "DiagnosticDataType": "OS",
            "AdditionalDataURI": null,
            "@odata.etag": "\"3829a0dfb400266551b\"",
            "@odata.context": "/redfish/v1/$metadata#LogEntry.LogEntry",
            "Id": "FailureScreen",
            "Name": "Failure Screen",
            "@odata.type": "#LogEntry.v1_13_0.LogEntry",
            "@odata.id": "/redfish/v1/Systems/1/LogServices/DiagnosticLog/Entries/FailureScreen"
        },
        {
            "@odata.etag": "\"12629f2da6cf2ae17ee\"",
            "@odata.context": "/redfish/v1/$metadata#LogEntry.LogEntry",
            "@odata.type": "#LogEntry.v1_13_0.LogEntry",
            "@odata.id": "/redfish/v1/Systems/1/LogServices/DiagnosticLog/Entries/MPFA"
        }
    ]
}
5,创建用于下载FFDC日志文件的Redfish X-Auth-Token。
curl -D header.txt -L -s -k -u USERID:PASSW0RD -X POST 'https://192.168.70.125/redfish/v1/SessionService/Sessions' -H 'Content-Type: application/json' --data ' {    "UserName" : "USERID",    "Password" : "password" }

Response:
{
    "UserName": "USERID",
    "@odata.etag": "\"1d08af338c332a22cf6\"",
    "Context": "",
    "Oem": {
        "Lenovo": {
        }
    },
    "CreatedTime": "2024-04-06T22:53:42+00:00",
    "SessionType": "Redfish",
    "@odata.context": "/redfish/v1/$metadata#Session.Session",
    "Password": null,
    "Id": "25",
    "Name": "25",
    "@odata.type": "#Session.v1_5_0.Session",
    "@odata.id": "/redfish/v1/SessionService/Sessions/25"
}
6,在header.txt文件中查找X-Auth-Token。
cat header.txt

Response:
HTTP/1.1 201 Created
Date: Sat, 06 Apr 2024 22:53:42 GMT
Content-Type: application/json
Transfer-Encoding: chunked
Connection: keep-alive
Location: /redfish/v1/SessionService/Sessions/25
X-Auth-Token: 552B0845264B078EEE52204EA11071CD0486134B
ETag: "1d08af338c332a22cf6"
OData-Version: 4.0
Content-Language: en
Cache-Control: no-store
Server: XCC Web Server
Strict-Transport-Security: max-age=31536000; includeSubDomains
Content-Security-Policy: default-src 'self'; connect-src *; script-src 'self'; img-src 'self' data:; style-src 'self'; font-src 'self'; child-src 'self'; object-src 'none'; frame-ancestors 'none'
X-XSS-Protection: 1; mode=block
X-Content-Type-Options: nosniff
Cache-Control: no-cache, no-store, must-revalidate, private
X-Frame-Options: DENY
Referrer-Policy: same-origin
X-Permitted-Cross-Domain-Policies: value
X-Download-Options: value
7,下载FFDC日志文件。
wget --header="X-Auth-Token: 552B0845264B078EEE52204EA11071CD0486134B" https://192.168.70.125/imm_dump/FFDC/7D75_J1111111_xcc_240406-224717.tzz --no-check-certificate

Response:
Connecting to 192.168.70.125:443... connected.
HTTP request sent, awaiting response... 200 OK
Length: 18458411 (18M) [application/octet-stream]
Saving to: ‘7D75_J1111111_xcc_240406-224717.tzz’
7D75_J1111111_xcc_240406-2 100%[========================================>]  17.60M  4.35MB/s    in 4.0s
十、ThinkSystem SR635/SR655收集miniFFDC日志
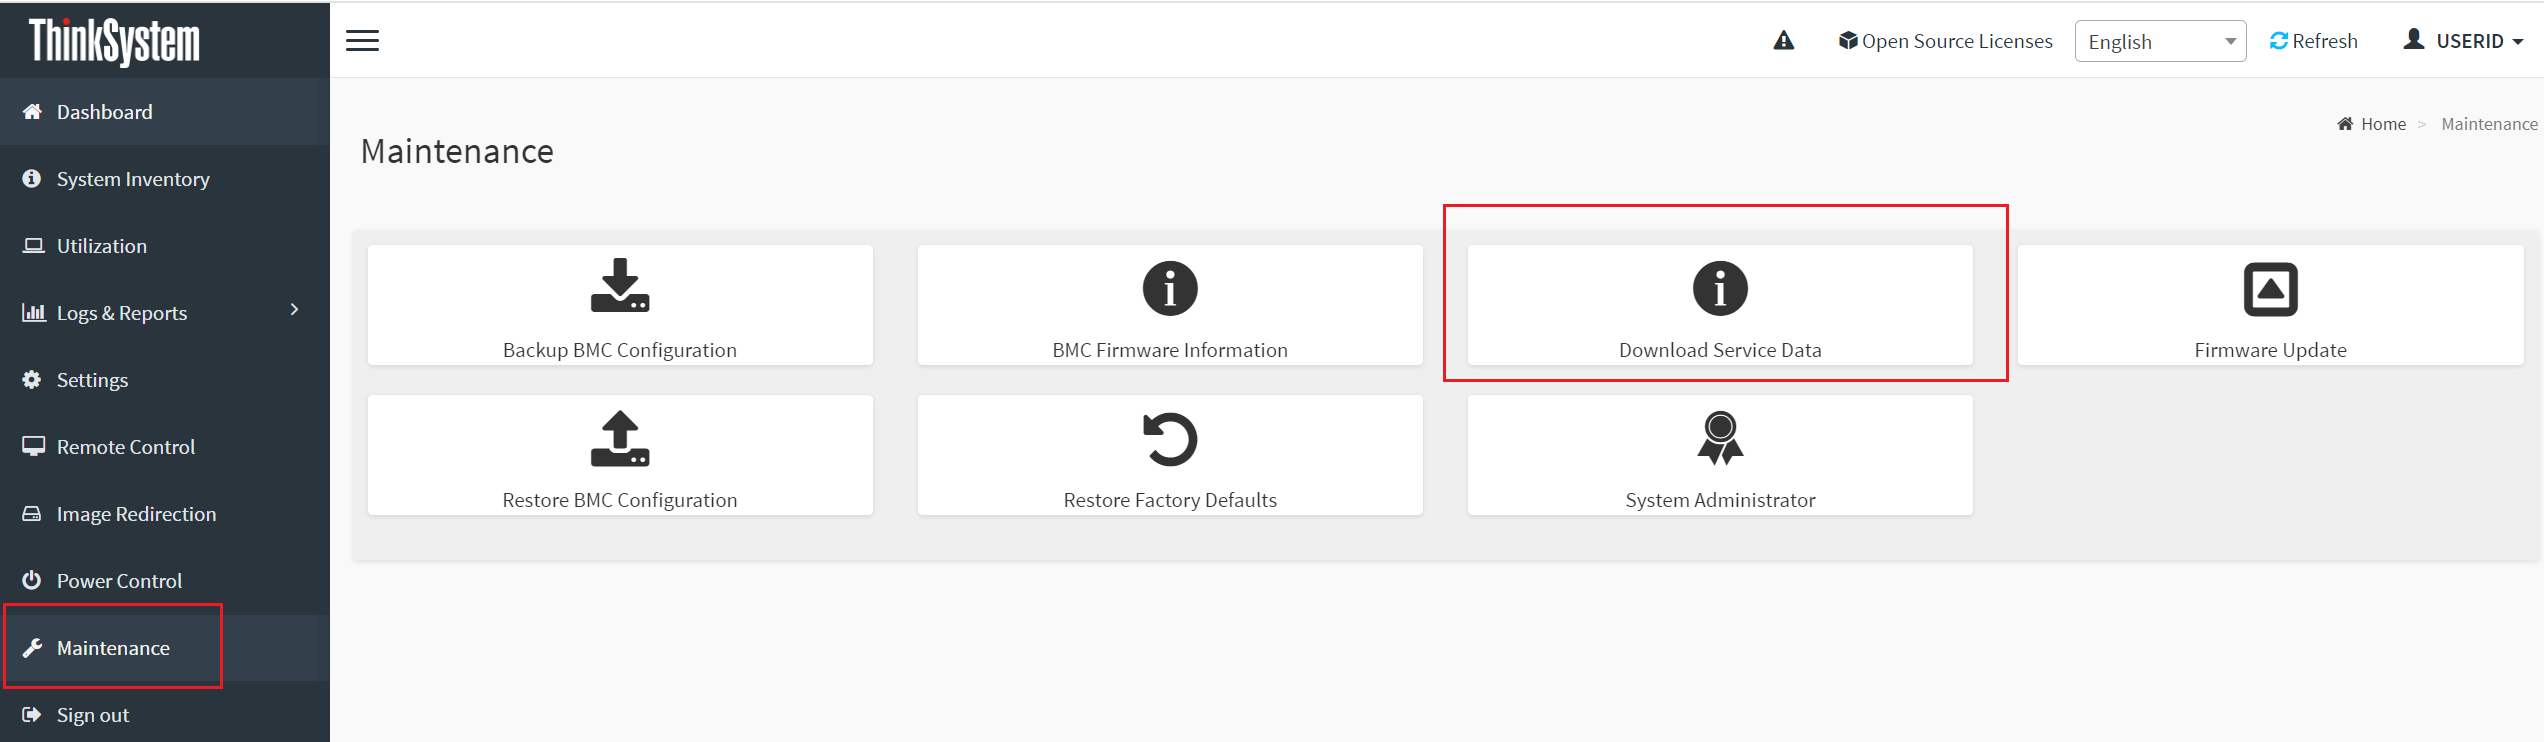
1,登录到 TSM,点击 “Maintenance” - “Download Service Data”。
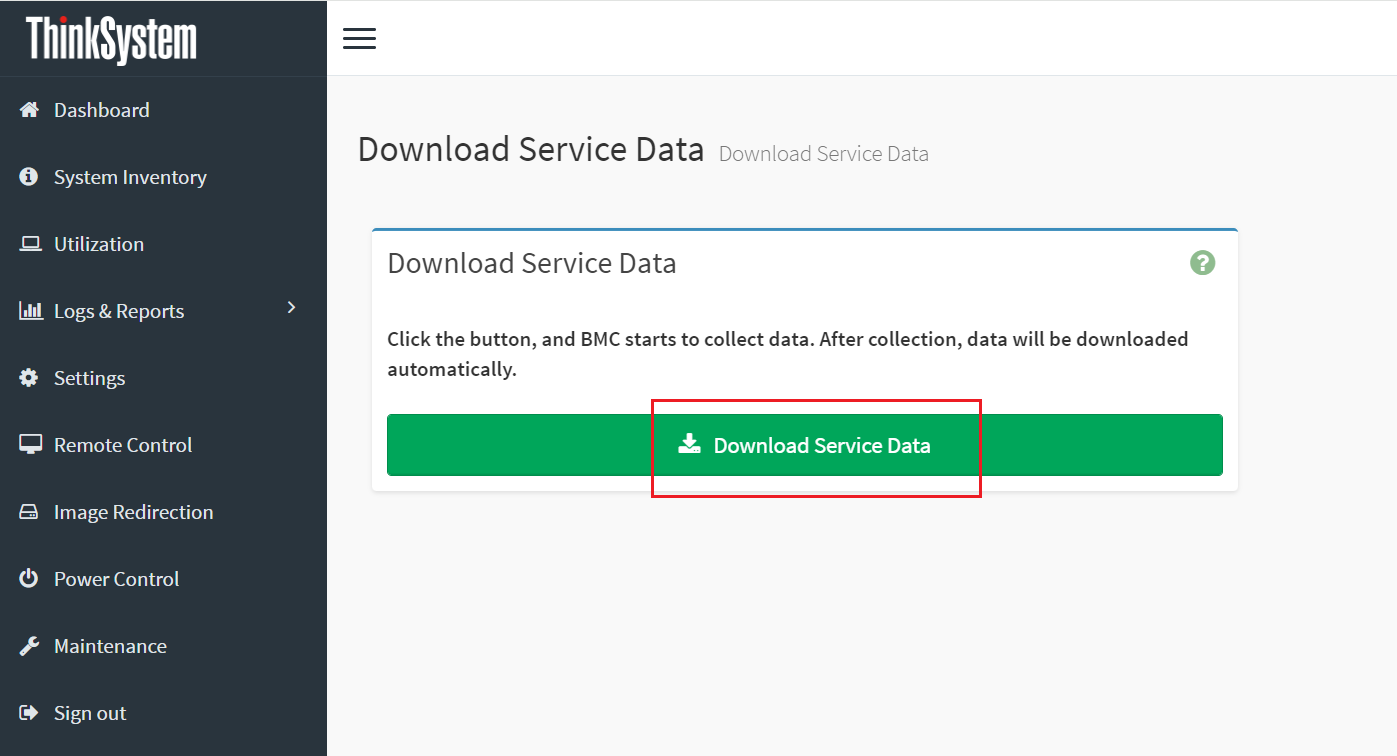
2,点击 “Download Service Data”按钮开始收集miniFFDC日志。日志收集完成后会自动下载到本地。
参考资料
- XCC: https://pubs.lenovo.com/xcc/
- XCC2: https://pubs.lenovo.com/xcc2/
- LXCE: https://pubs.lenovo.com/lxce-overview/
- LXPM: https://pubs.lenovo.com/lxpm-overview/
- LXCA: https://pubs.lenovo.com/lxca/
- LXCO: https://pubs.lenovo.com/lxco/
- LXCI: https://pubs.lenovo.com/lxci-overview/
- LXCM: https://pubs.lenovo.com/lxca/lxca_usemobileapp.html
- LenovoPress Document
声明:本文根据Lenovo官方文档进行整理,文章中涉及到的工具及使用方法可能会由于版本的变化而变化。请最终以Lenovo官方文档为准。