Intel VROC (Intel Virtual RAID on CPU)
一、Intel VROC介绍
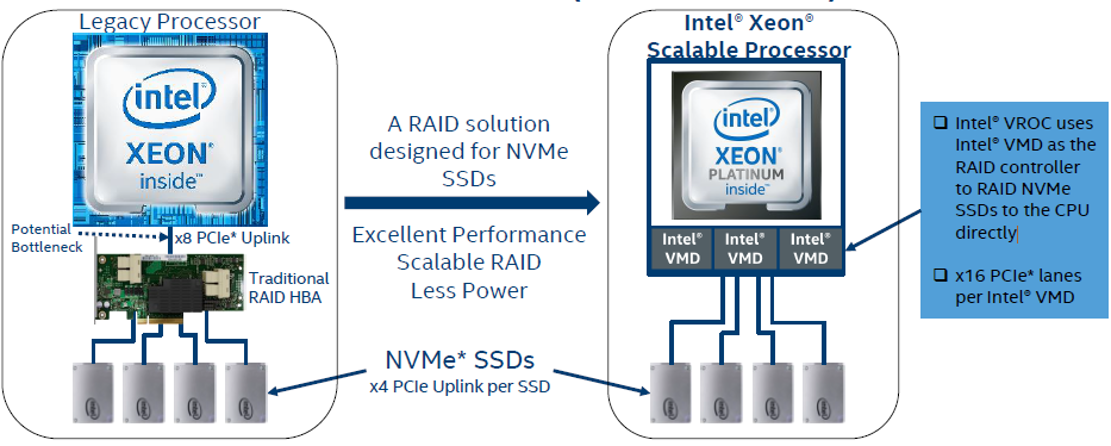
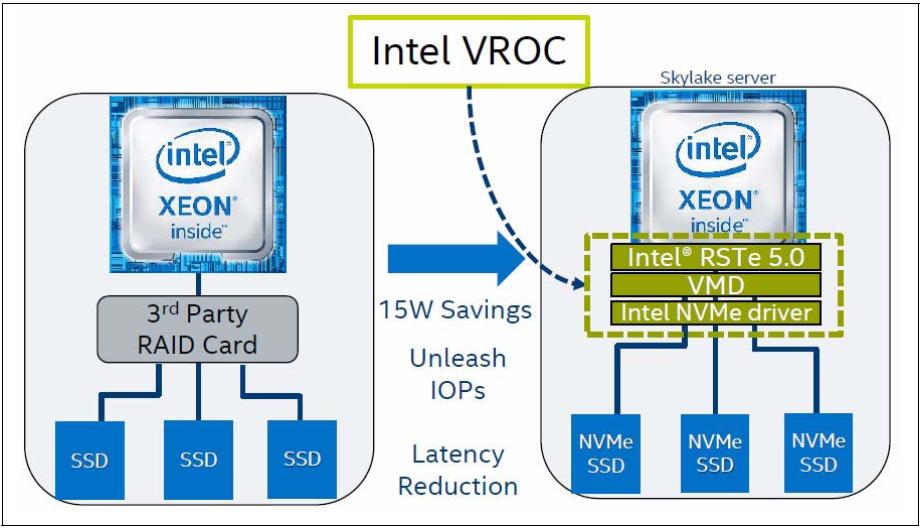
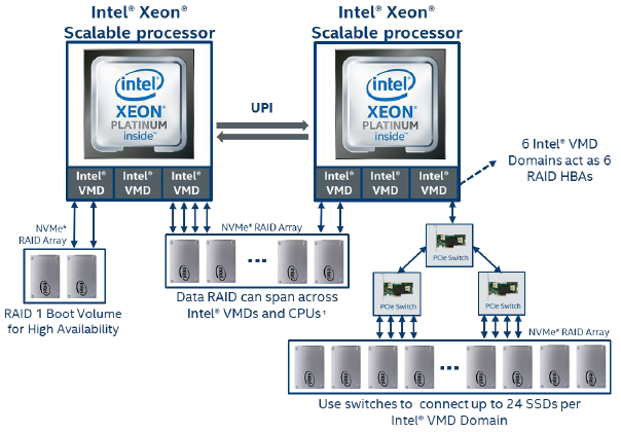
Intel VROC (Intel Virtual RAID on CPU)是一种企业级RAID解决方案,专门为直接连接到CPU的NVMe ssd设计。Intel VROC通过采用Intel Xeon可扩展处理器上实现的Intel卷管理器件(Intel Volume Management Device,简称VMD)来实现。Intel VMD增强了处理器提供的PCIe通道数,保证了NVMe连接的可靠性。Intel VROC使用Intel VMD实现更简单的NVMe RAID解决方案,不需要额外的RAID适配器或HBA。
英特尔VMD和英特尔VROC驱动程序作为企业存储堆栈的一部分一起提供。在Windows和Linux环境中,这些包提供LED管理和热插拔功能,用于直接连接RAID 0、1、5和10阵列。如果不需要RAID,那么英特尔VROC可以通过只打开英特尔VMD域的方式在直通模式下使用。在VMware环境中,Intel VMD可以在vSAN和直接连接的存储模式中使用,其额外的好处是RAID 1用于冗余引导卷(boot drive)。
在使用常规RAID适配器架构时,通常的硬件链接方式为 SSD –>BP –>RAID卡 –>RISER –>主板
在使用VROC时,通常的硬件链接方式为 SSD –>BP –>主板
传统RAID卡是安装在服务器的PCIe插槽中的扩展卡,通过线缆与硬盘、ssd等存储设备相连,RAID适配器将连接到它的多个物理驱动器组合成虚拟驱动器或逻辑驱动器。然后,操作系统将每个逻辑驱动器(实际上至少是两个物理设备)识别为一个物理驱动器。而使用Intel VROC 则不需要额外的RAID适配器, 可以在平台的PCIe通道上快速访问直接连接的NVMe ssd。
二、Intel VROC 与 Intel RSTe的关系
RSTe与VROC以前属于Intel同一个产品家族中的两个相关产品, RSTe属于SATA RAID产品,而VROC则属于NVMe RAID产品。Intel在2019年推出VROC 6.0的时候对 Intel Rapid Storage Technology Enterprise(Intel RSTe)和 Intel Virtual RAID on CPU(Intel VROC)产品进行了整合,仅使用Intel Virtual RAID on CPU (Intel® VROC) 这个名称 。RSTe名称从此不再使用。原有RSTe中的所有功能在VROC中得以保留。当然,在一些旧的产品中可能仍然会见到RSTe的身影,在所有新产品中都将会是VROC。
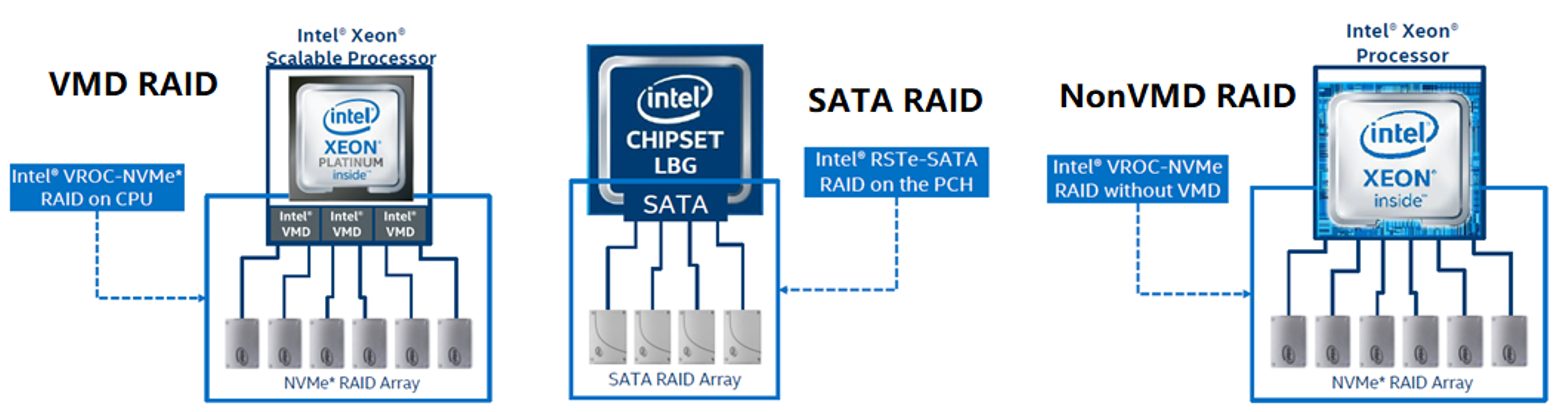
从Intel VROC 6.0开始,VROC包将在同一软件解决方案中包含三个子产品。由硬件确定激活的子集:
- Intel® VROC (VMD NVMe* RAID): For platforms with CPU(s) with Intel® Volume Management Device (Intel® VMD) architecture.
- Intel® VROC (SATA RAID): For platforms with chipsets that include this functionality.
- Intel® VROC (Non-VMD NVMe* RAID): For platforms with CPUs that do not have an Intel® VMD architecture and are therefore not Intel® VROC (VMD, NVMe*, RAID).
三、VROC与CPU/平台
Intel VROC依赖于支持VMD技术的Intel Xeon处理器。因此,Intel VROC仅支持带有VMD技术的Intel Xeon cpu。
• Intel® Xeon® Scalable Processors (-SP, -D, -W)
   • Intel® VMD 1.0 on all SKUs
• 2nd Generation Intel® Xeon® Scalable Processors (-SP, -D, -W)
   • Intel® VMD 1.0 on all SKUs
• 3rd Generation Intel® Xeon® Scalable Processors (-SP, -D, -W)
   • Intel® VMD 1.0 on 4S/8S (-H)
   • Intel® VMD 2.0 on all other SKUs
• 4th Generation Intel® Xeon® Scalable Processors (-SP, -W, -EE)
   • Intel® VMD 3.0 on all SKUs
• 5th Generation Intel® Xeon® Scalable Processors (-SP, -W)
   • Intel® VMD 3.0 on all SKUs
• All SKU Levels: Platinum, Gold, Silver, and Bronze
[!NOTE]
注意:此列表列出了支持Intel®VROC和Intel®VMD的处理器,但此功能必须由OEM或ODM在平台级别启用(需要在uEFI/BIOS中启用相关功能)。仅仅因为使用了这些家族中的一个处理器,并不保证该平台支持英特尔®VROC和英特尔®VMD。与平台提供商确认支持。
| Intel Xeon | VMD Generation | Chipset | Platform | Platform Codename | VROC Release | NVMe RAID | SATA RAID |
|---|---|---|---|---|---|---|---|
| Intel® Xeon® Scalable Processors | 1.0 | C620 Series | Mainstream | Purley | VROC 5.3 | ✔ | ✔ |
| Intel® Xeon® W Processor | 1.0 | C400 Series | Workstation | Basin Falls | VROC 5.3 | ✔ | ✔ |
| Intel® Xeon® E Processor | N/A | C240 Series | Entry | Mehlow | VROC 5.3 | ✔ | |
| Intel® Xeon® D Processor | 1.0 | Integrated in CPU | SOC | Bakerville | VROC 5.3 | ✔ | ✔ |
| 2nd Generation Intel® Xeon® Scalable Processors | 1.0 | C620 Series | Mainstream | Purley R | VROC 6.0 | ✔ | ✔ |
| 3rd Generation Intel® Xeon® Scalable Processors 4S/8S (-H) | 1.0 | C620 Series | Mainstream | Cedar Island | VROC 7.0 | ✔ | ✔ |
| 3rd Generation Intel® Xeon® Scalable Processors 1S/2S | 2.0 | C620 Series | Mainstream | Whitley | VROC 7.5 | ✔ | ✔ |
| Intel® Xeon® D Processor | 2.0 | Integrated in CPU | SOC | Idaville | VROC 7.7 | ✔ | ✔ |
| 4th Generation Intel® Xeon® Scalable Processors 2S/4S | 3.0 | C741 Series | Mainstream | Eagle Stream | VROC 8.0 | ✔ | ✔ |
| 4th Generation Intel® Xeon® Scalable Processors 1S/2S | 3.0 | W790 Series | Mainstream | Fishhawk Falls | VROC 8.0 | ✔ | ✔ |
| 4th Generation Intel® Xeon® Scalable Processors - EE 1S/2S | 3.0 | C741 Series | Telecom | Eagle Stream | VROC 8.5 | ✔ | ✔ |
| 5th Generation Intel® Xeon® Scalable Processors 2S/4S | 3.0 | C741 Series | Mainstream | Eagle Stream Refresh | VROC 8.5 | ✔ | ✔ |
| Sub-Product | NVMe* SSD RAID | SATA RAID | Bootable RAID | Hot-Plug/Surprise Removal | LED Management | 3rd Party Drive Support |
|---|---|---|---|---|---|---|
| Intel® VROC (VMD NVMe RAID) | ✔ | ✔ | ✔ | ✔ | ✔ | |
| Intel® VROC (SATA RAID) | ✔ | ✔ | ✔ | ✔ | ✔ | |
| Intel® VROC (non-VMD NVMe RAID) | ✔ |
四、操作系统兼容列表
官方参考链接:Intel® Virtual RAID on CPU (Intel® VROC) supported configurations
五、RAID方案对比

Intel VROC on ThinkSystem
一、参数汇总
| Attribute | Intel RSTe/VROC SATA RAID | Intel VROC NVMe RAID |
|---|---|---|
| Controller chip | Intel PCH (RSTe) | Intel CPU (VROC) |
| Port interface | 6 Gb SATA | PCIe NVMe |
| Port connectors | 2x onboard SATA | Varies |
| Drive interface | SATA | NVMe |
| Drive type | HDD, SSD | SSD |
| Hot-swap drives | Yes (system dependent) | Yes (system dependent) |
| RAID levels | 0, 1, 10, 5 | 0, 1, 10, 5‡ |
| JBOD mode | Yes | Yes |
‡ Intel VROC NVMe RAID supports Intel-branded NVMe SSDs without any additional license. To enable RAID using non-Intel NVMe SSDs requires VROC Premium which is a Feature on Demand (FoD) license upgrade.
二、VROC的许可模式
2.1、有两种获得授权的方式:
- SW: 通过SW license提供授权.
- 通过XCC导入 FoD key进行激活.
- VMD NVMe Raid有两种选择:
- Intel SSD only (default, free)
- Premium (support 3-rd part SSD, need to install FoD key).
2.2、Intel VROC NVMe RAID 授权类型
| Description | IntelNVMeSSDs | Non-Intel NVMe SSDs | RAID 0 | RAID 1 | RAID 10 | RAID 5 |
|---|---|---|---|---|---|---|
| Intel VROC (VMD NVMeRAID) Intel SSD Only | Yes | No | Yes | Yes | Yes | Yes |
| Intel VROC RAID1 Only | Yes | Yes | No | Yes | No | No |
| Intel VROC (VMD NVMeRAID) Standard | Yes | Yes | Yes | Yes | Yes | No |
| Intel VROC (VMD NVMeRAID) Premium | Yes | Yes | Yes | Yes | Yes | Yes |
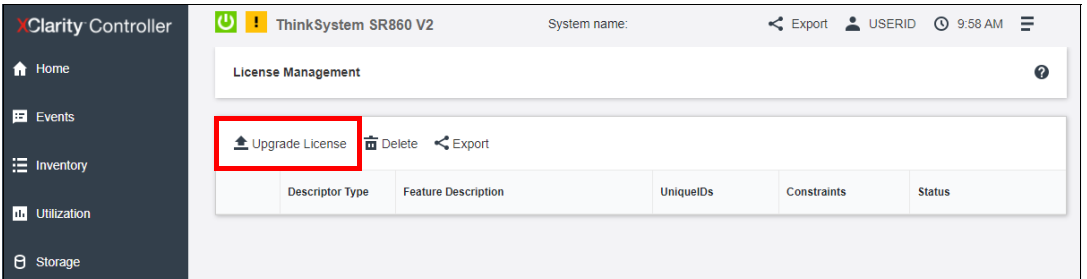
通过XCC导入FoD Key(许可证),注意这一步并不是必须的,请参考前文确定何种情况下需要购买FoD。

三、配置VROC
3.1、通过uEFI HII配置VROC
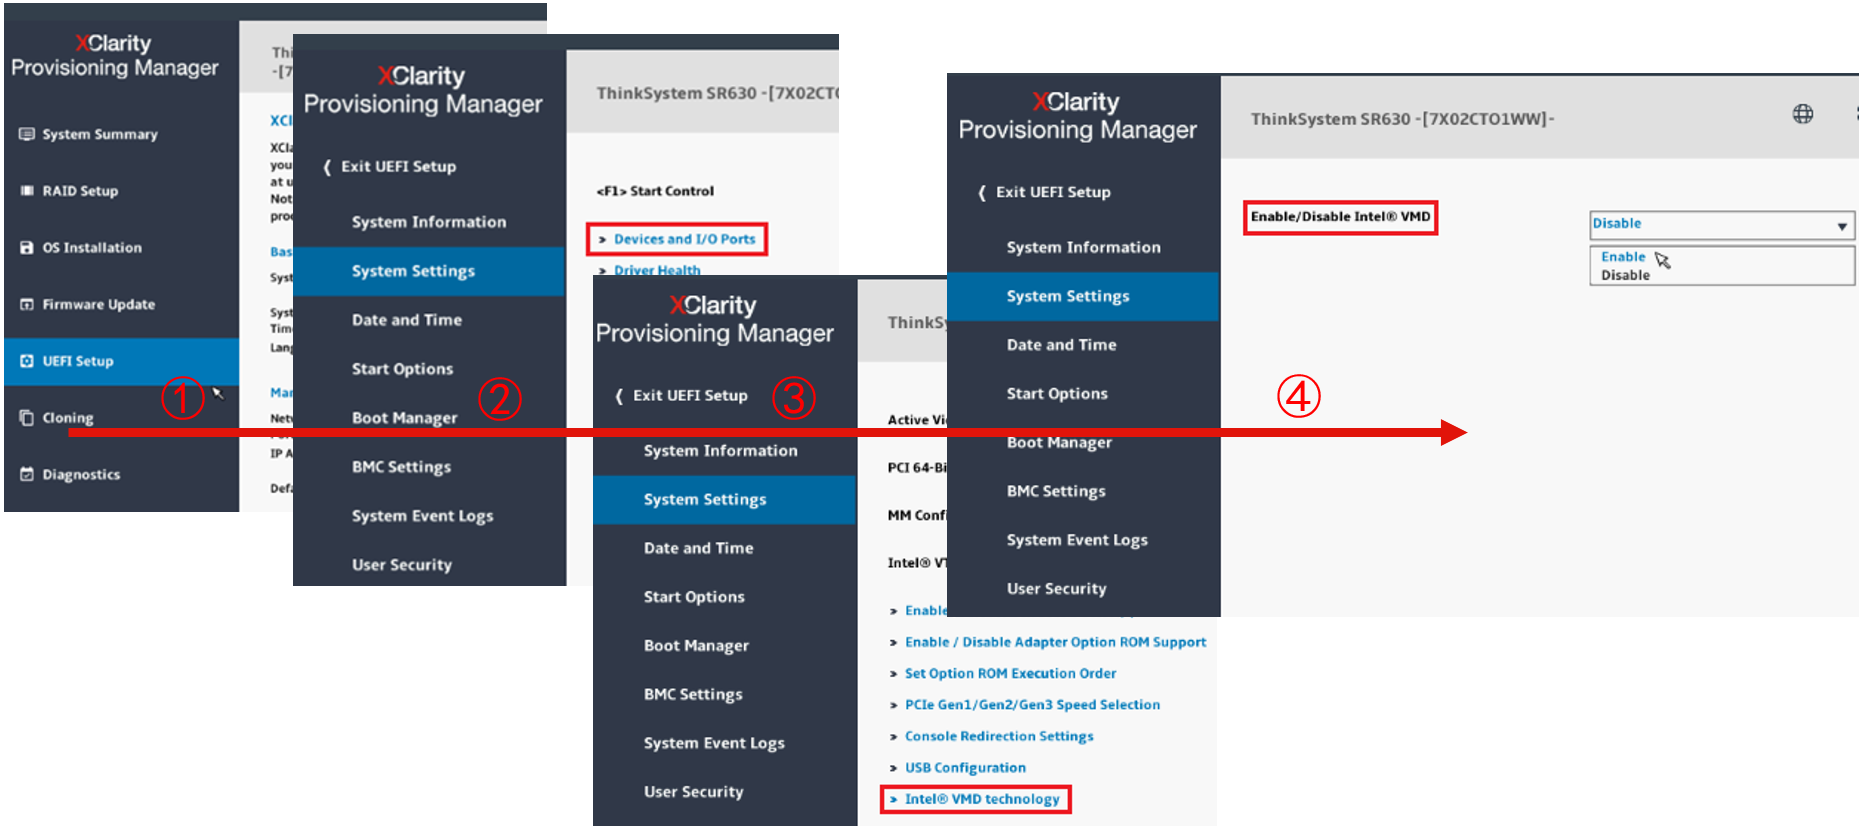
1、Enter LXPM (F1) -> UEFI setup -> System setting -> Device and I/O Ports -> Intel VMD Technology -> Enable/Disable Intel VMD -> Enter to enable.
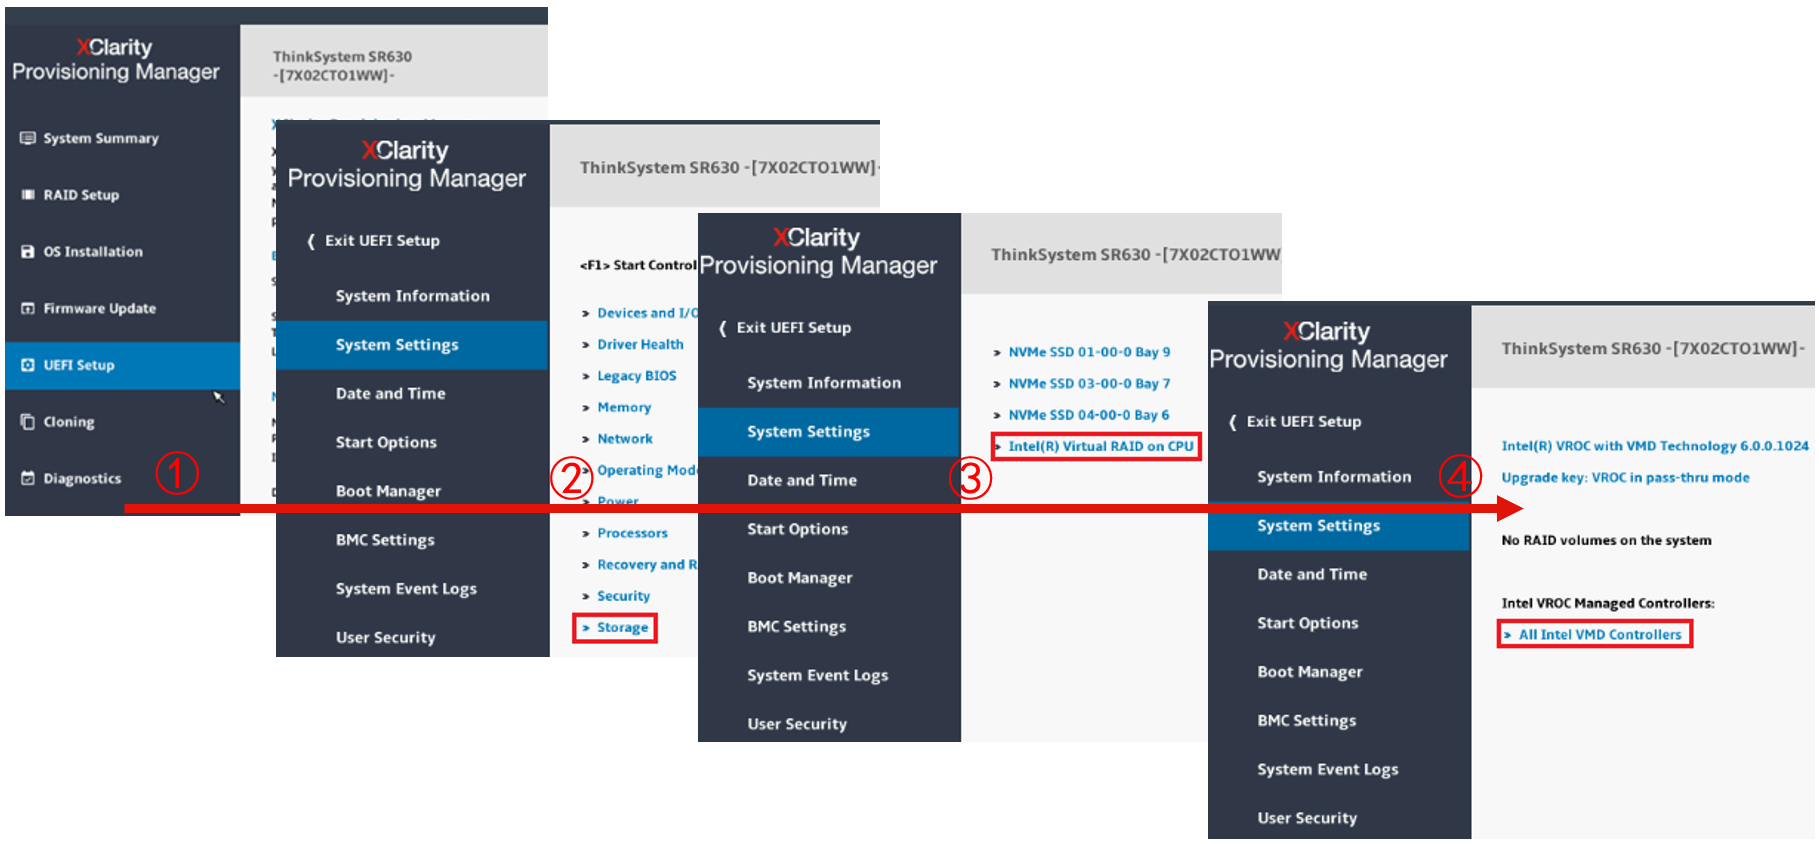
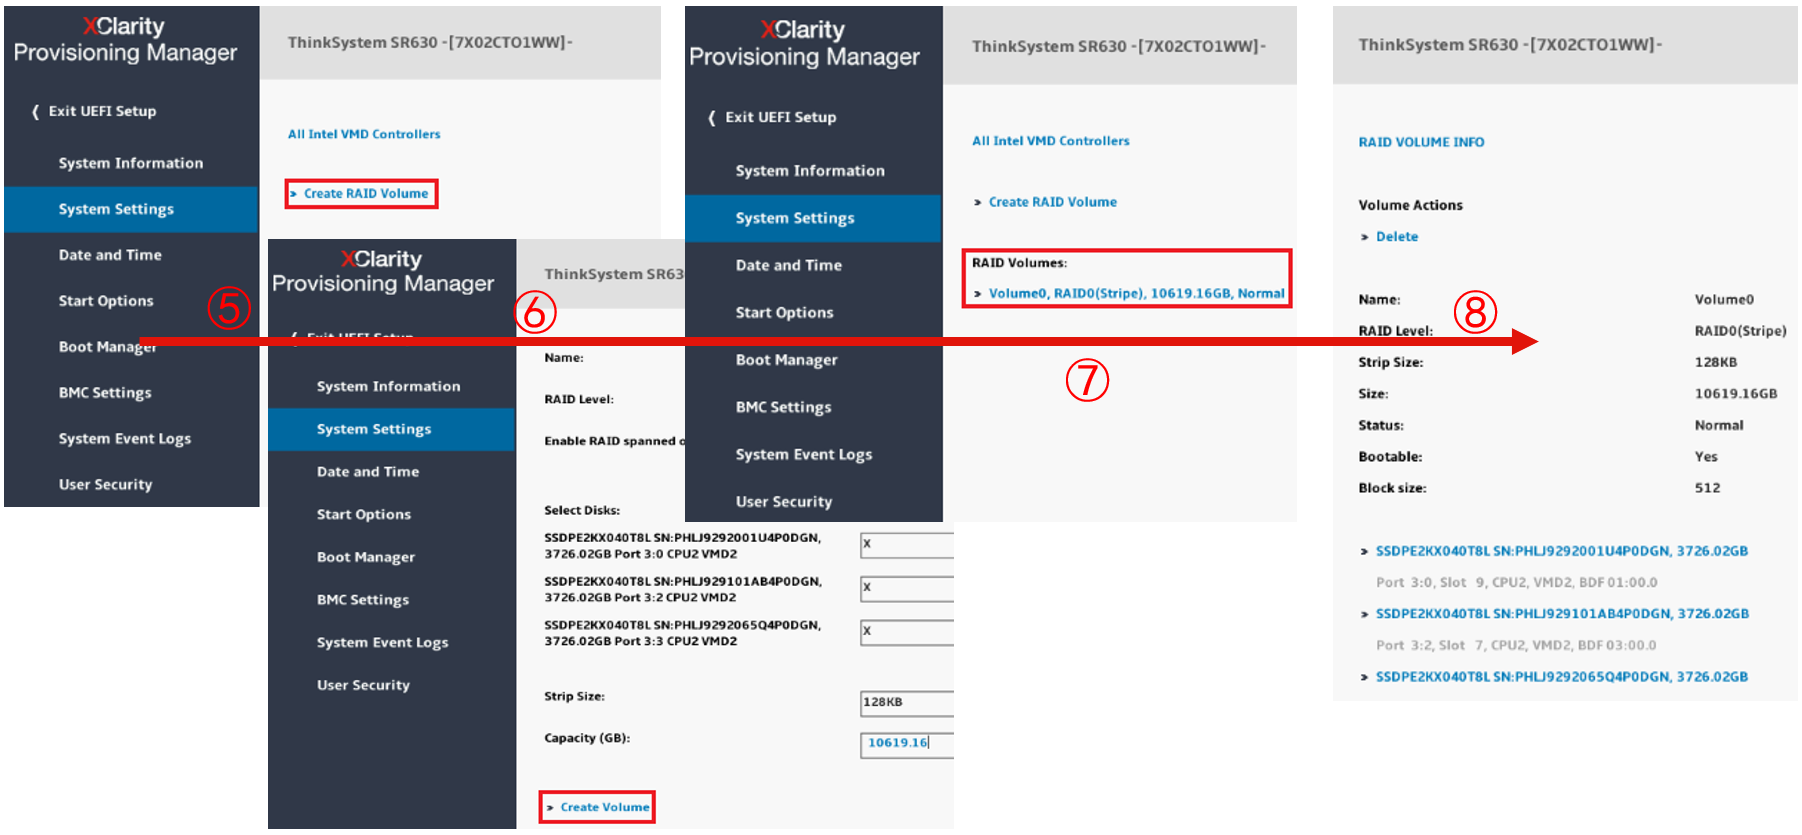
2、通过uEFI HII界面创建 RAID,这里仅对过程进行演示。
3.2、通过Windows VROC GUI
1、在UEFI中已经启用VMD。
2、以Windows Server 2016为例,在OS安装过程中加载驱动,iaStorE 是 SATA 驱动, iaVROC 是 NVMe 驱动,这里我们是将VROC安装为boot drive。
3、OS安装完成后,需要提前安装Microsoft .NET Framework,然后再安装VROC GUI

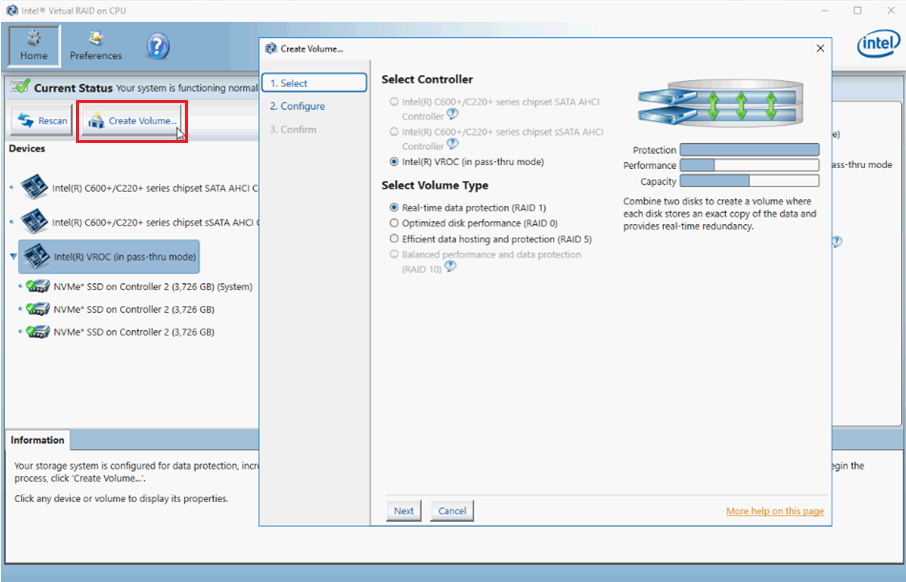
4、启动VROC GUI,点击“Create Volume”,选择“RAID 1”。这里仅做演示。
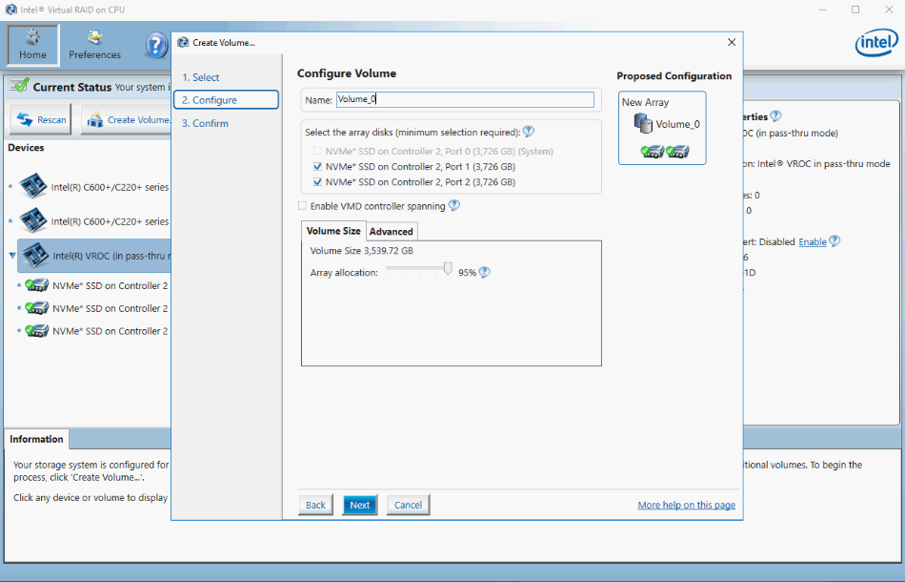
5、选择SSD,输入Volume的名子,设置Volume大小。在Advanced选择中勾选“Initialize Volume”。
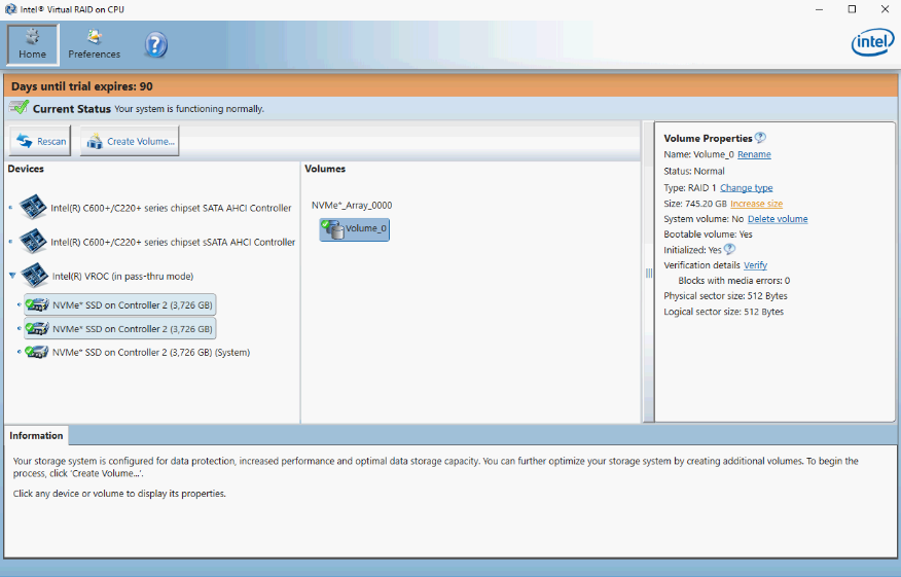
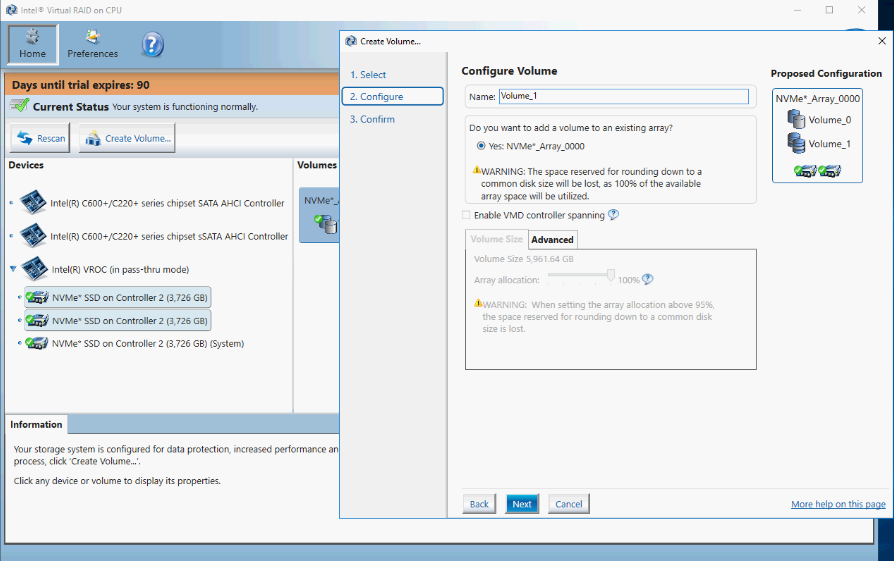
6、Volume初始化完成后界面如下,如果需要修改Volume的大小,可以在右侧选择”Increase size”。通常只能增加,不能减少。
3.3、VROC for Linux
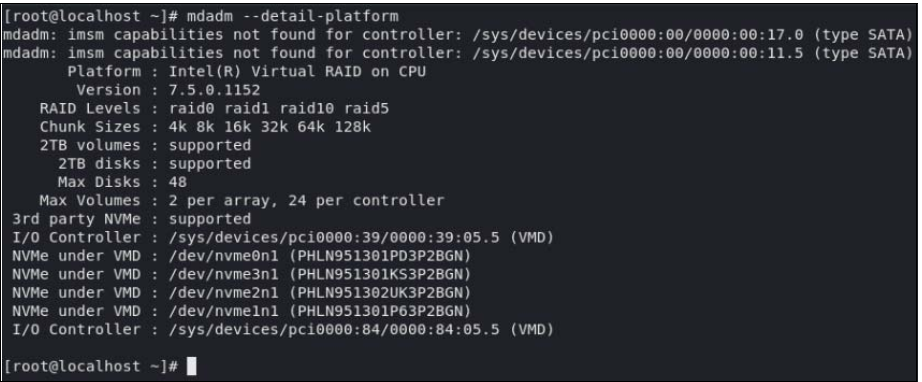
1、这里我们假设已经在uEFI中创建好VROC Volume,并且已经安装好Linux操作系统。主要演示如何在Linux中查看管理VROC Volume。验证NVMe驱动器是否存在。
[root@localhost ~]# fdisk -l | grep nvme
Disk /dev/nvme0n1: 2.9 TiB, 3200631791616 bytes, 6251233968 sectors
Disk /dev/nvme3n1: 2.9 TiB, 3200631791616 bytes, 6251233968 sectors
Disk /dev/nvme2n1: 2.9 TiB, 3200631791616 bytes, 6251233968 sectors
Disk /dev/nvme1n1: 2.9 TiB, 3200631791616 bytes, 6251233968 sectors

[root@localhost ~]# ls -l /dev/nvme*
crw-------. 1 root root 242, 0 Oct 29 05:25 /dev/nvme0
brw-rw----. 1 root disk 259, 0 Oct 29 05:25 /dev/nvme0n1
crw-------. 1 root root 242, 1 Oct 29 05:25 /dev/nvme1
brw-rw----. 1 root disk 259, 3 Oct 29 05:25 /dev/nvme1n1
crw-------. 1 root root 242, 2 Oct 29 05:25 /dev/nvme2
brw-rw----. 1 root disk 259, 2 Oct 29 05:25 /dev/nvme2n1
crw-------. 1 root root 242, 3 Oct 29 05:25 /dev/nvme3
brw-rw----. 1 root disk 259, 1 Oct 29 05:25 /dev/nvme3n1

[root@localhost ~]# lspci | grep -i non-vol
10000:01:00.0 Non-Volatile memory controller: Intel Corporation NVMe Datacenter SSD [3DNAND, Beta Rock Controller]
10000:02:00.0 Non-Volatile memory controller: Intel Corporation NVMe Datacenter SSD [3DNAND, Beta Rock Controller]
10000:03:00.0 Non-Volatile memory controller: Intel Corporation NVMe Datacenter SSD [3DNAND, Beta Rock Controller]
10000:04:00.0 Non-Volatile memory controller: Intel Corporation NVMe Datacenter SSD [3DNAND, Beta Rock Controller]

[root@localhost ~]# lsblk | grep nvme
nvme0n1 259:0 0 2.9T 0 disk
nvme3n1 259:1 0 2.9T 0 disk
nvme2n1 259:2 0 2.9T 0 disk
nvme1n1 259:3 0 2.9T 0 disk
2、检查VMD是否开启
[root@localhost block]# lspci -tv

+-[10000:00]-+-00.0-[01]----00.0 Intel Corporation NVMe Datacenter SSD [3DNAND, Beta Rock Controller]
|            +-01.0-[02]----00.0 Intel Corporation NVMe Datacenter SSD [3DNAND, Beta Rock Controller]
|            +-02.0-[03]----00.0 Intel Corporation NVMe Datacenter SSD [3DNAND, Beta Rock Controller]
|            +-03.0-[04]----00.0 Intel Corporation NVMe Datacenter SSD [3DNAND, Beta Rock Controller]
... (skipped)

[root@localhost block]# ls -al /sys/block
total 0
drwxr-xr-x. 2 root root 0 Oct 29 05:25 .
dr-xr-xr-x. 13 root root 0 Oct 29 05:25 ..
lrwxrwxrwx. 1 root root 0 Oct 29 05:25 dm-0 -> ../devices/virtual/block/dm-0
lrwxrwxrwx. 1 root root 0 Oct 29 05:25 dm-1 -> ../devices/virtual/block/dm-1
lrwxrwxrwx. 1 root root 0 Oct 29 05:25 dm-2 -> ../devices/virtual/block/dm-2
lrwxrwxrwx. 1 root root 0 Oct 29 05:25 md126 -> ../devices/virtual/block/md126
lrwxrwxrwx. 1 root root 0 Oct 29 05:25 md127 -> ../devices/virtual/block/md127
lrwxrwxrwx. 1 root root 0 Oct 29 05:25 nvme0n1 ->
../devices/pci0000:39/0000:39:05.5/pci10000:00/10000:00:00.0/10000:01:00.0/nvme
/nvme0/nvme0n1
lrwxrwxrwx. 1 root root 0 Oct 29 05:25 nvme1n1 ->
../devices/pci0000:39/0000:39:05.5/pci10000:00/10000:00:01.0/10000:02:00.0/nvme
/nvme1/nvme1n1
lrwxrwxrwx. 1 root root 0 Oct 29 05:25 nvme2n1 ->
../devices/pci0000:39/0000:39:05.5/pci10000:00/10000:00:02.0/10000:03:00.0/nvme
/nvme2/nvme2n1
lrwxrwxrwx. 1 root root 0 Oct 29 05:25 nvme3n1 -> ../devices/pci0000:39/0000:39:05.5/pci10000:00/10000:00:03.0/10000:04:00.0/nvme
/nvme3/nvme3n1

[root@localhost block]# dmesg | grep -i vmd
[ 2.289217] vmd 0000:39:05.5: PCI host bridge to bus 10000:00
[ 2.291104] vmd 0000:39:05.5: Bound to PCI domain 10000
[ 2.294872] vmd 0000:84:05.5: PCI host bridge to bus 10001:00
[ 2.297417] vmd 0000:84:05.5: Bound to PCI domain 10001
... (skipped)
3,在Linux系统中创建VROC RAID是需要通过MD RAID来创建,VROC已经集成在Linux内核中的。在 “Linux VROC release kit”中包含有ledmon和mdadm两个RPM,在使用之前先确保将这两个RPM已经更新。
4,其它操作,包括通过mdadm创建软RAID与正常创建软RAID无区别。可以使用mdadm对RAID进行管理。
参考文档
User Guides for Intel® Virtual RAID on CPU (Intel® VROC)
Intel® Virtual RAID on CPU (Intel® VROC) Supported Configurations
Resources for Intel® Virtual RAID on CPU (Intel® VROC)
Using Intel VMD and Intel VROC NVMe RAID on Lenovo ThinkSystem Servers