ISPConfig是一个web托管控制面板,允许您通过web浏览器配置以下服务:Apache web服务器、Postfix
邮件服务器、MySQL、BIND nameserver、PureFTPd、SpamAssassin、ClamAV、Mailman等等。本次安
装采用CentOS7.3,系统采用最小化安装。
一,安装前准备
1,由于系统是最小化安装的,所以先安装一些必要的工具
yum -y install net-tools wget NetworkManager-tui
2,配置IP地址,可以使用nmtui进行配置,配置一个固定IP,最好不要使用DHCP,确保可以连接互联网
3,调整/etc/hosts 和 /etc/hostname
vi /etc/hosts
192.168.17.10 ispc.kclouder.local ISPConfig3
vi /etc/hostname
ispc.kclouder.local
4,关闭并禁用防火墙
systemctl stop firewalld
systemctl disable firewalld
5,禁用SELinux
编辑 /etc/selinux/config,设置SELINUX=disabled
6,在CentOS系统上启用EPEL存储库,因为安装的许多包在官方的CentOS 7存储库中不可用
yum -y install epel-release
yum -y install yum-priorities
7,然后更新系统上的现有包
yum -y update
8,安装开发工具
yum -y groupinstall ‘Development Tools’
9,修改完成后,reboot重启系统
二,安装 Apache, MySQL, phpMyAdmin
1,执行以下命令
yum -y install ntp httpd mod_ssl mariadb-server php php-mysql php- mbstring phpmyadmin
2,在httpd配置文件末尾添加apache标头规则,重启httpd服务
echo “RequestHeader unset Proxy early” >> /etc/httpd/conf/httpd.conf
systemctl restart httpd
三,安装 Dovecot,Postfix,Getmail
1,安装Dovecot
yum -y install dovecot dovecot-mysql dovecot-pigeonhole
2,创建一个空的dovecot-sql.conf文件和创建符号链接
touch /etc/dovecot/dovecot-sql.conf
ln -s /etc/dovecot/dovecot-sql.conf /etc/dovecot-sql.conf
ln -s /etc/dovecot/dovecot.conf /etc/dovecot.conf
3,创建系统启动链接并启动Dovecot
systemctl enable dovecot
systemctl start dovecot
4,安装Postfix
yum -y install postfix
5,关闭Sendmail,启动Postfix和MariaDB (MySQL)
systemctl enable mariadb.service
systemctl start mariadb.service
systemctl stop sendmail.service
systemctl disable sendmail.service
systemctl enable postfix.service
systemctl restart postfix.service
6,安装Getmail
yum -y install getmail
四,设置MySQL密码并配置phpMyAdmin
1,设置MySQLroot帐户密码
mysql_secure_installation
Set root password? [Y/n] <– ENTER
New password: <– yourrootsqlpassword
Re-enter new password: <– yourrootsqlpassword
Password updated successfully!
Reloading privilege tables..
… Success!
Remove anonymous users? [Y/n] <– ENTER
Disallow root login remotely? [Y/n] <– ENTER
Remove test database and access to it? [Y/n] <– ENTER
Reload privilege tables now? [Y/n] <– ENTER
2,配置phpMyAdmin
vi /etc/httpd/conf.d/phpMyAdmin.conf
修改如下行,注示掉Require ip,并添加一行
#Require ip 127.0.0.1
#Require ip ::1
Require all granted
3,将phpMyAdmin中的身份验证从cookie更改为http
vi /etc/phpMyAdmin/config.inc.php
$cfg[‘Servers’][$i][‘auth_type’] = ‘http’;
4,创建系统启动链接并启动httpd服务
systemctl enable httpd.service
systemctl restart httpd.service
五,安装 Amavisd-new,SpamAssassin,ClamAV,and Postgrey
1,执行以下命令进行安装
yum -y install amavisd-new spamassassin clamav-server clamav-data clamav-update clamav-filesystem clamav clamav-scanner-systemd clamav-devel clamav-lib clamav-server-systemd unzip bzip2 perl-DBD-mysql postgrey re2c
2,编辑freshclam配置文件/etc/freshclam.conf
vi /etc/freshclam.conf,并注释掉Example
3,要使用freshclam自动更新ClamAV签名,编辑文件/etc/sysconfig/freshclam
vi /etc/sysconfig/freshclam,并注释掉“FRESHCLAM_DELAY=”行
4,启动freshclam, amavisd, and clamd.amavisd
sa-update
freshclam
systemctl enable amavisd.service
systemctl start amavisd.service
systemctl start clamd@amavisd.service
systemctl enable postgrey.service
systemctl start postgrey.service
六,安装 Apache with mod_php, mod_fcgi/PHP5, PHP-FPM
1,执行以下命令进行安装
yum -y install php php-devel php-gd php-imap php-ldap php-mysql php-odbc php-pear php-xml php-xmlrpc php-pecl-apc php-mbstring php-mcrypt php-mssql php-snmp php-soap php-tidy curl curl-devel perl-libwww-perl ImageMagick libxml2 libxml2-devel mod_fcgid php-cli httpd-devel php-fpm
2,编辑/etc/php.ini
vi /etc/php.ini,更改错误报告(以便不再显示通知),设置时区并取消注释cgi.fix_pathinfo=1:
;error_reporting = E_ALL & ~E_DEPRECATED
error_reporting = E_ALL & ~E_NOTICE & ~E_DEPRECATED & ~E_STRICT
cgi.fix_pathinfo=1
date.timezone = ‘Asia/Shanghai’
3,允许httpd和PHP-FPM在引导时启动并启动PHP-FPM服务
systemctl start php-fpm.service
systemctl enable php-fpm.service
systemctl enable httpd.service
systemctl restart httpd.service
七,安装mod_python
1,Apache的mod_python模块不能通过RPM包安装,需要通过源代码编译安装。首先安装python开发文件并下载mod_python文件
yum -y install python-devel
cd /usr/local/src/
wget http://dist.modpython.org/dist/mod\_python-3.5.0.tgz
tar xfz mod_python-3.5.0.tgz
cd mod_python-3.5.0
2,配置和编译模块,安装模块
./configure
make
make install
3,在Apache中启用该模块
echo ‘LoadModule python_module modules/mod_python.so’ > /etc/httpd/conf.modules.d/10-python.conf
systemctl restart httpd.service
八,安装 PureFTPd
1,执行以下命令进行安装
yum -y install pure-ftpd
2,创建系统启动链接并启动pure-ftpd服务
systemctl enable pure-ftpd.service
systemctl start pure-ftpd.service
3,安装openssl
yum install openssl
4,编辑pure-ftpd.conf配置文件
vi /etc/pure-ftpd/pure-ftpd.conf
# This option can accept three values :
# 0 : disable SSL/TLS encryption layer (default).
# 1 : accept both traditional and encrypted sessions.
# 2 : refuse connections that don’t use SSL/TLS security mechanisms,
# including anonymous sessions.
# Do not uncomment this blindly. Be sure that :
# 1) Your server has been compiled with SSL/TLS support (–with-tls),
# 2) A valid certificate is in place,
# 3) Only compatible clients will log in.
TLS 1
5,创建一个SSL证书
mkdir -p /etc/ssl/private/
openssl req -x509 -nodes -days 7300 -newkey rsa:2048 -keyout /etc/ssl/private/pure-ftpd.pem -out /etc/ssl/private/pure-ftpd.pem
chmod 600 /etc/ssl/private/pure-ftpd.pem
6,重启pure-ftpd服务
systemctl restart pure-ftpd.service
九,安装BIND
1,执行以下命令进行安装
yum -y install bind bind-utils haveged
2,备份现有的/etc/named.conf文件,并创建一个新文件
cp /etc/named.conf /etc/named.conf_bak
cat /dev/null > /etc/named.conf
vi /etc/named.conf
3,配置内容如下
//
// named.conf
//
// Provided by Red Hat bind package to configure the ISC BIND named(8) DNS
// server as a caching only nameserver (as a localhost DNS resolver only).
//
// See /usr/share/doc/bind*/sample/ for example named configuration files.
//
options {
listen-on port 53 { any; };
listen-on-v6 port 53 { any; };
directory “/var/named”;
dump-file “/var/named/data/cache_dump.db”;
statistics-file “/var/named/data/named_stats.txt”;
memstatistics-file “/var/named/data/named_mem_stats.txt”;
allow-query { any; };
allow-recursion {“none”;};
recursion no;
};
logging {
channel default_debug {
file “data/named.run”;
severity dynamic;
};
};
zone “.” IN {
type hint;
file “named.ca”;
};
include “/etc/named.conf.local”;
4,创建文件/etc/ names.conf。
touch /etc/named.conf.local
5,创建启动链接并启动bind服务
systemctl enable named.service
systemctl start named.service
systemctl enable haveged.service
systemctl start haveged.service
十,安装 Webalizer,AWStats,Jailkit
1,执行以下命令进行安装
yum -y install webalizer awstats perl-DateTime-Format-HTTP perl-DateTime-Format-Builder
2,编辑/etc/httpd/conf.d/awstats.conf
vi /etc/httpd/conf.d/awstats.conf
将 Require local 修改为 Require all granted
3,重启Apache
systemctl restart httpd.service
4,安装Jailkit,用于chroot SSH用户和cronjobs
cd /tmp
wget http://olivier.sessink.nl/jailkit/jailkit-2.19.tar.gz
tar xvfz jailkit-2.19.tar.gz
cd jailkit-2.19
./configure
make && make install
cd ..
rm -rf jailkit-2.19*
十一,安装 Fail2Ban,rkhunter
1,执行以下命令进行安装
yum -y install iptables-services fail2ban fail2ban-systemd
2,创建/etc/fail2ban/jail.local文件,启用对ssh、mail和ftp服务的monitor
vi /etc/fail2ban/jail.local
[sshd]
enabled = true
action = iptables[name=sshd, port=ssh, protocol=tcp]
[pure-ftpd]
enabled = true
action = iptables[name=FTP, port=ftp, protocol=tcp]
maxretry = 3
[dovecot]
enabled = true
action = iptables-multiport[name=dovecot, port=”pop3,pop3s,imap,imaps”, protocol=tcp]
maxretry = 5
[postfix-sasl]
enabled = true
action = iptables-multiport[name=postfix-sasl, port=”smtp,smtps,submission”, protocol=tcp]
maxretry = 3
3,创建启动链接并启动fail2ban服务
systemctl enable fail2ban.service
systemctl start fail2ban.service
4,安装 rkhunter
yum -y install rkhunter
十二,安装Mailman
1,执行以下命令进行安装
yum -y install mailman
2,在开始使用Mailman之前,必须先创建一个名为Mailman的邮件列表
touch /var/lib/mailman/data/aliases
postmap /var/lib/mailman/data/aliases
/usr/lib/mailman/bin/newlist mailman
ln -s /usr/lib/mailman/mail/mailman /usr/bin/mailman
3,/usr/lib/mailman/bin/newlist mailman 配置如下:
Enter the email of the person running the list: <– admin email address, e.g. listadmin@example.com
Initial mailman password: <– admin password for the mailman list
To finish creating your mailing list, you must edit your /etc/aliases (or
equivalent) file by adding the following lines, and possibly running the
`newaliases’ program:
mailman mailing list
mailman: “/usr/lib/mailman/mail/mailman post mailman”
mailman-admin: “/usr/lib/mailman/mail/mailman admin mailman”
mailman-bounces: “/usr/lib/mailman/mail/mailman bounces mailman”
mailman-confirm: “/usr/lib/mailman/mail/mailman confirm mailman”
mailman-join: “/usr/lib/mailman/mail/mailman join mailman”
mailman-leave: “/usr/lib/mailman/mail/mailman leave mailman”
mailman-owner: “/usr/lib/mailman/mail/mailman owner mailman”
mailman-request: “/usr/lib/mailman/mail/mailman request mailman”
mailman-subscribe: “/usr/lib/mailman/mail/mailman subscribe mailman”
mailman-unsubscribe: “/usr/lib/mailman/mail/mailman unsubscribe mailman”
Hit enter to notify mailman owner… <– ENTER
4,编辑/etc/aliases
vi /etc/aliases,添加如下行
mailman: “/usr/lib/mailman/mail/mailman post mailman”
mailman-admin: “/usr/lib/mailman/mail/mailman admin mailman”
mailman-bounces: “/usr/lib/mailman/mail/mailman bounces mailman”
mailman-confirm: “/usr/lib/mailman/mail/mailman confirm mailman”
mailman-join: “/usr/lib/mailman/mail/mailman join mailman”
mailman-leave: “/usr/lib/mailman/mail/mailman leave mailman”
mailman-owner: “/usr/lib/mailman/mail/mailman owner mailman”
mailman-request: “/usr/lib/mailman/mail/mailman request mailman”
mailman-subscribe: “/usr/lib/mailman/mail/mailman subscribe mailman”
mailman-unsubscribe: “/usr/lib/mailman/mail/mailman unsubscribe mailman”
5,执行以下操作
newaliases
systemctl restart postfix.service
6,编辑/etc/httpd/conf.d/mailman.conf
vi /etc/httpd/conf.d/mailman.conf
编辑内容如下:
#
httpd configuration settings for use with mailman.
#
ScriptAlias /mailman/ /usr/lib/mailman/cgi-bin/
ScriptAlias /cgi-bin/mailman/ /usr/lib/mailman/cgi-bin/
AllowOverride None
Options ExecCGI
Order allow,deny
Allow from all
Alias /pipermail/ /var/lib/mailman/archives/public/
Alias /pipermail /var/lib/mailman/archives/public/
Options Indexes MultiViews FollowSymLinks
AllowOverride None
Order allow,deny
Allow from all
AddDefaultCharset Off
Uncomment the following line, to redirect queries to /mailman to the
listinfo page (recommended).
RedirectMatch ^/mailman[/]*$ /mailman/listinfo
7,重启Apache,创建启动链接并启动Mailman
systemctl restart httpd.service
systemctl enable mailman.service
systemctl start mailman.service
十三,安装 Roundcube webmail
1,执行以下命令进行安装
yum -y install roundcubemail
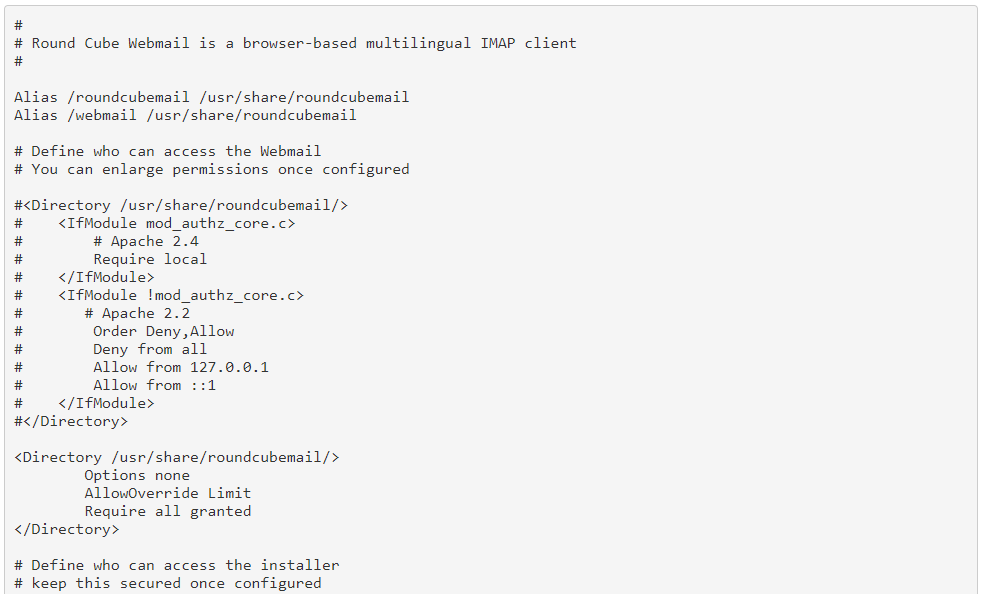
2,编辑配置文件如下图:
vi /etc/httpd/conf.d/roundcubemail.conf


3,重启Apache
systemctl restart httpd.service
4,创建RoundCube数据库
mysql -u root -p
CREATE DATABASE roundcubedb;
CREATE USER roundcubeuser@localhost IDENTIFIED BY ‘roundcubepassword’;
GRANT ALL PRIVILEGES on roundcubedb.* to roundcubeuser@localhost ;
FLUSH PRIVILEGES;
exit
5,配置RoundCube Webmail
通过浏览器登录 http://192.168.17.10/roundcubemail/installer,输入上一步创建的数据库名
称,账号密码

6,编辑配置文件如下,将网页里生成的文件拷贝到如下配置文件中
vi /etc/roundcubemail/config.inc.php
<?php
/* Local configuration for Roundcube Webmail */
// ———————————-
// SQL DATABASE
// ———————————-
// Database connection string (DSN) for read+write operations
// Format (compatible with PEAR MDB2): db_provider://user:password@host/database
// Currently supported db_providers: mysql, pgsql, sqlite, mssql or sqlsrv
// For examples see http://pear.php.net/manual/en/package.database.mdb2.intro-dsn.php
// NOTE: for SQLite use absolute path: ‘sqlite:////full/path/to/sqlite.db?mode=0646’
$config[‘db_dsnw’] = ‘mysql://roundcubeuser:roundcubepassword@localhost/roundcubedb’;
// ———————————-
// IMAP
// ———————————-
// The mail host chosen to perform the log-in.
// Leave blank to show a textbox at login, give a list of hosts
// to display a pulldown menu or set one host as string.
// To use SSL/TLS connection, enter hostname with prefix ssl:// or tls://
// Supported replacement variables:
// %n - hostname ($_SERVER[‘SERVER_NAME’])
// %t - hostname without the first part
// %d - domain (http hostname $_SERVER[‘HTTP_HOST’] without the first part)
// %s - domain name after the ‘@’ from e-mail address provided at login screen
// For example %n = mail.domain.tld, %t = domain.tld
// WARNING: After hostname change update of mail_host column in users table is
// required to match old user data records with the new host.
$config[‘default_host’] = ‘localhost’;
// provide an URL where a user can get support for this Roundcube installation
// PLEASE DO NOT LINK TO THE ROUNDCUBE.NET WEBSITE HERE!
$config[‘support_url’] = ‘’;
// this key is used to encrypt the users imap password which is stored
// in the session record (and the client cookie if remember password is enabled).
// please provide a string of exactly 24 chars.
$config[‘des_key’] = ‘FHgaM7ihtMkM1cBwckOcxPdT’;
// ———————————-
// PLUGINS
// ———————————-
// List of active plugins (in plugins/ directory)
$config[‘plugins’] = array();
// Set the spell checking engine. Possible values:
// - ‘googie’ - the default
// - ‘pspell’ - requires the PHP Pspell module and aspell installed
// - ‘enchant’ - requires the PHP Enchant module
// - ‘atd’ - install your own After the Deadline server or check with the people at http://www.afterthedeadline.com before using their API
// Since Google shut down their public spell checking service, you need to
// connect to a Nox Spell Server when using ‘googie’ here. Therefore specify the ‘spellcheck_uri’
$config[‘spellcheck_engine’] = ‘pspell’;
7,然后在web安装程序中按下“继续”按钮。在下面的页面中,按下“初始化数据库”按钮。
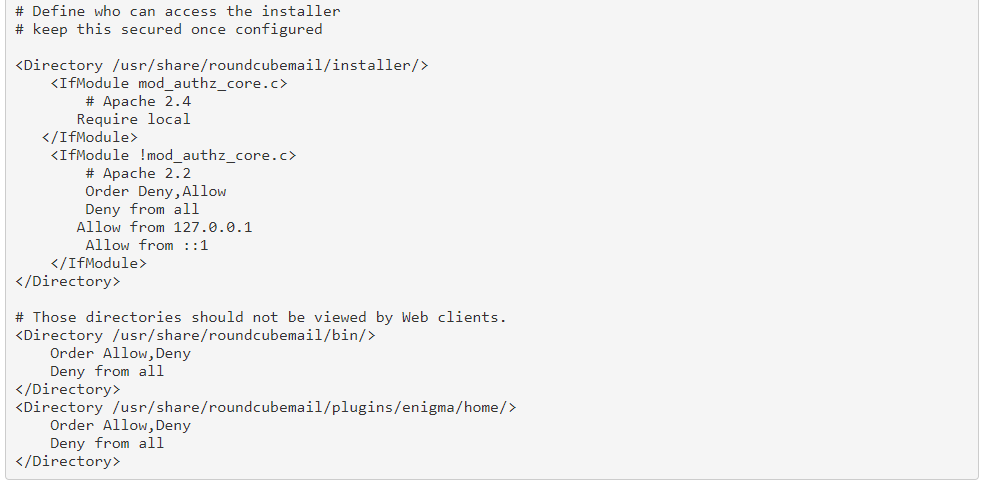
最后,禁用Roundecubemail安装程序。更改apache roundcubemail.conf配置文件
vi /etc/httpd/conf.d/roundcubemail.conf
8,重启Apache
systemctl restart httpd.service
9,确认RoundCube Mail可以正常登录
在浏览器登录 http://192.168.17.10/roundcubemail/
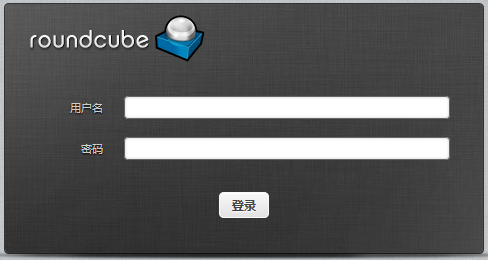
10,输入邮箱账号,验证可以正常登录
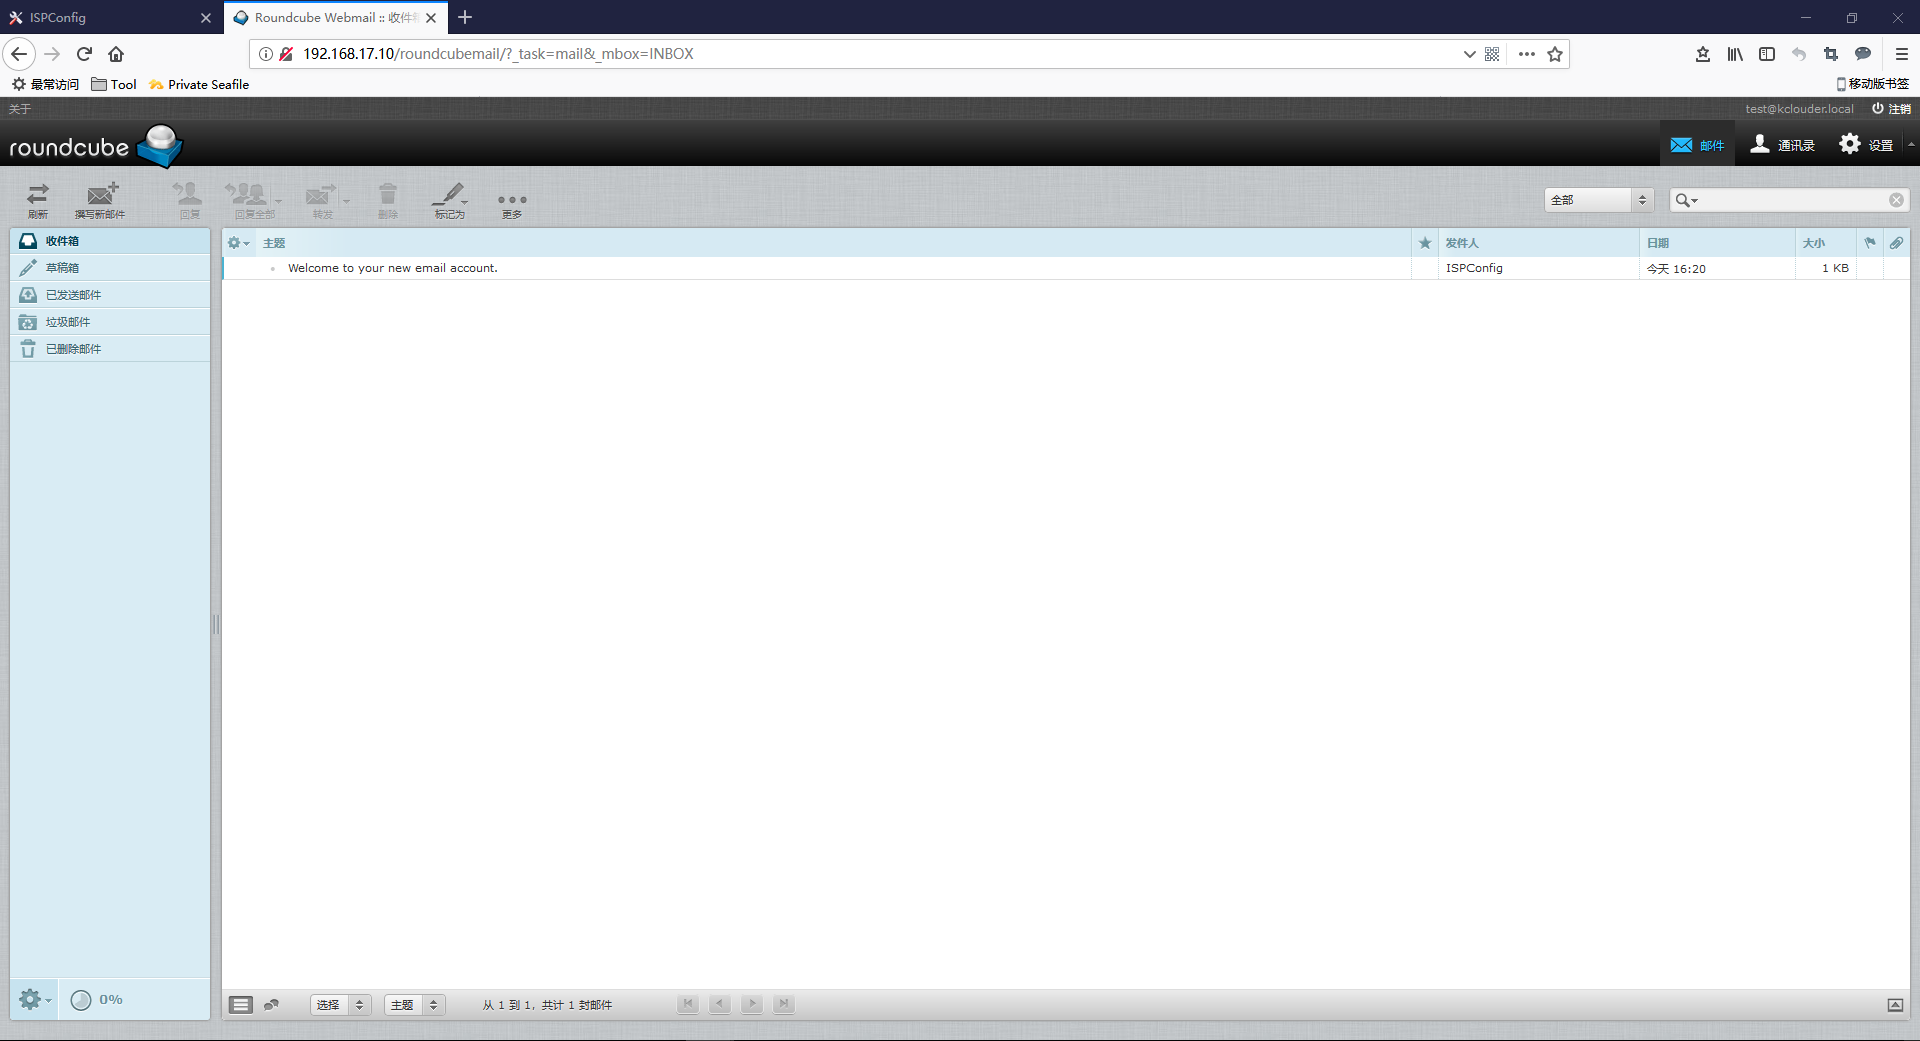
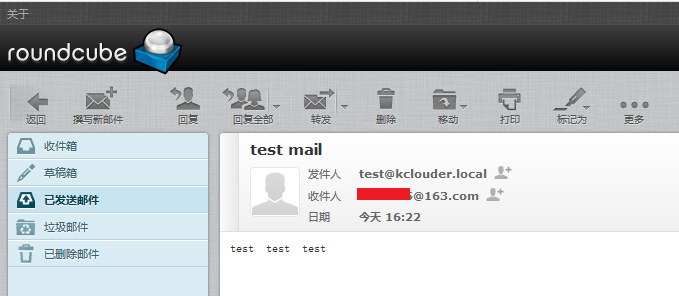
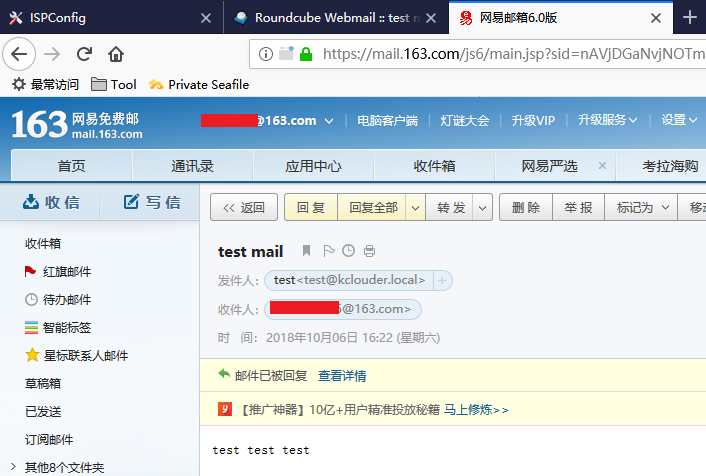
11,验证邮箱可以正常发送邮件
测试向一个163邮箱账号发送一封邮件,确认邮件可以正常接收到
十四,安装 ISPConfig 3.1
1,执行以下操作进行安装
cd /tmp
wget -O ispconfig.tar.gz https://git.ispconfig.org/ispconfig/ispconfig3/repository/archive.tar.gz?ref=stable-3.1
tar xfz ispconfig.tar.gz
cd ispconfig3*/install/
php -q install.php
Initial configuration
Operating System: CentOS 7.3
Following will be a few questions for primary configuration so be careful.
Default values are in [brackets] and can be accepted with .
Tap in “quit” (without the quotes) to stop the installer.
Select language (en,de) [en]: <– Hit Enter
Installation mode (standard,expert) [standard]: <– Hit Enter
Full qualified hostname (FQDN) of the server, eg server1.domain.tld [server1.canomi.com]: <– Hit Enter
MySQL server hostname [localhost]: <– Hit Enter
MySQL server port [3306]: <– Hit Enter
MySQL root username [root]: <– Hit Enter
MySQL root password []: <– Enter your MySQL root password
MySQL database to create [dbispconfig]: <– Hit Enter
MySQL charset [utf8]: <– Hit Enter
Configuring Postgrey
Configuring Postfix
Generating a 4096 bit RSA private key
……………………………………………………………..++
……………………………………………………………………………………………………………………….++
writing new private key to ‘smtpd.key’
You are about to be asked to enter information that will be incorporated
into your certificate request.
What you are about to enter is what is called a Distinguished Name or a DN.
There are quite a few fields but you can leave some blank
For some fields there will be a default value,
If you enter ‘.’, the field will be left blank.
Country Name (2 letter code) [AU]: <– Enter 2 letter country code
State or Province Name (full name) [Some-State]: <– Enter the name of the state
Locality Name (eg, city) []: <– Enter your city
Organization Name (eg, company) [Internet Widgits Pty Ltd]: <– Enter company name or press enter
Organizational Unit Name (eg, section) []: <– Hit Enter
Common Name (e.g. server FQDN or YOUR name) []: <– Enter the server hostname
Email Address []: <– Hit Enter
Configuring Mailman
Configuring Dovecot
Configuring Spamassassin
Configuring Amavisd
Configuring Getmail
Configuring BIND
Configuring Jailkit
Configuring Pureftpd
Configuring Apache
Configuring vlogger
Configuring Bastille Firewall
Configuring Fail2ban
[INFO] service OpenVZ not detected
Configuring Apps vhost
Installing ISPConfig
ISPConfig Port [8080]:
Admin password [admin]:
Do you want a secure (SSL) connection to the ISPConfig web interface (y,n) [y]: <– Hit Enter
Generating RSA private key, 4096 bit long modulus
…………………..++
………………………………………………………………………………………………………………..++
e is 65537 (0x10001)
You are about to be asked to enter information that will be incorporated
into your certificate request.
What you are about to enter is what is called a Distinguished Name or a DN.
There are quite a few fields but you can leave some blank
For some fields there will be a default value,
If you enter ‘.’, the field will be left blank.
Country Name (2 letter code) [AU]: <– Enter 2 letter country code
State or Province Name (full name) [Some-State]: <– Enter the name of the state
Locality Name (eg, city) []: <– Enter your city
Organization Name (eg, company) [Internet Widgits Pty Ltd]: <– Enter company name or press enter
Organizational Unit Name (eg, section) []: <– Hit Enter
Common Name (e.g. server FQDN or YOUR name) []: <– Enter the server hostname
Email Address []: <– Hit Enter
Please enter the following ‘extra’ attributes
to be sent with your certificate request
A challenge password []: <– Hit Enter
An optional company name []: <– Hit Enter
writing RSA key
Configuring DBServer
Installing ISPConfig crontab
no crontab for root
no crontab for getmail
Detect IP addresses
Restarting services …
Installation completed.
2,登录 ISPConfig
在浏览器通过http(s)://server1.example.com:8080/ or http(s)://ipaddress:8080/
登录ISPConfig web页面
https://192.168.17.10:8080/login/

ISPConfig主界面,首次登录后,请修改admin账号的默认密码
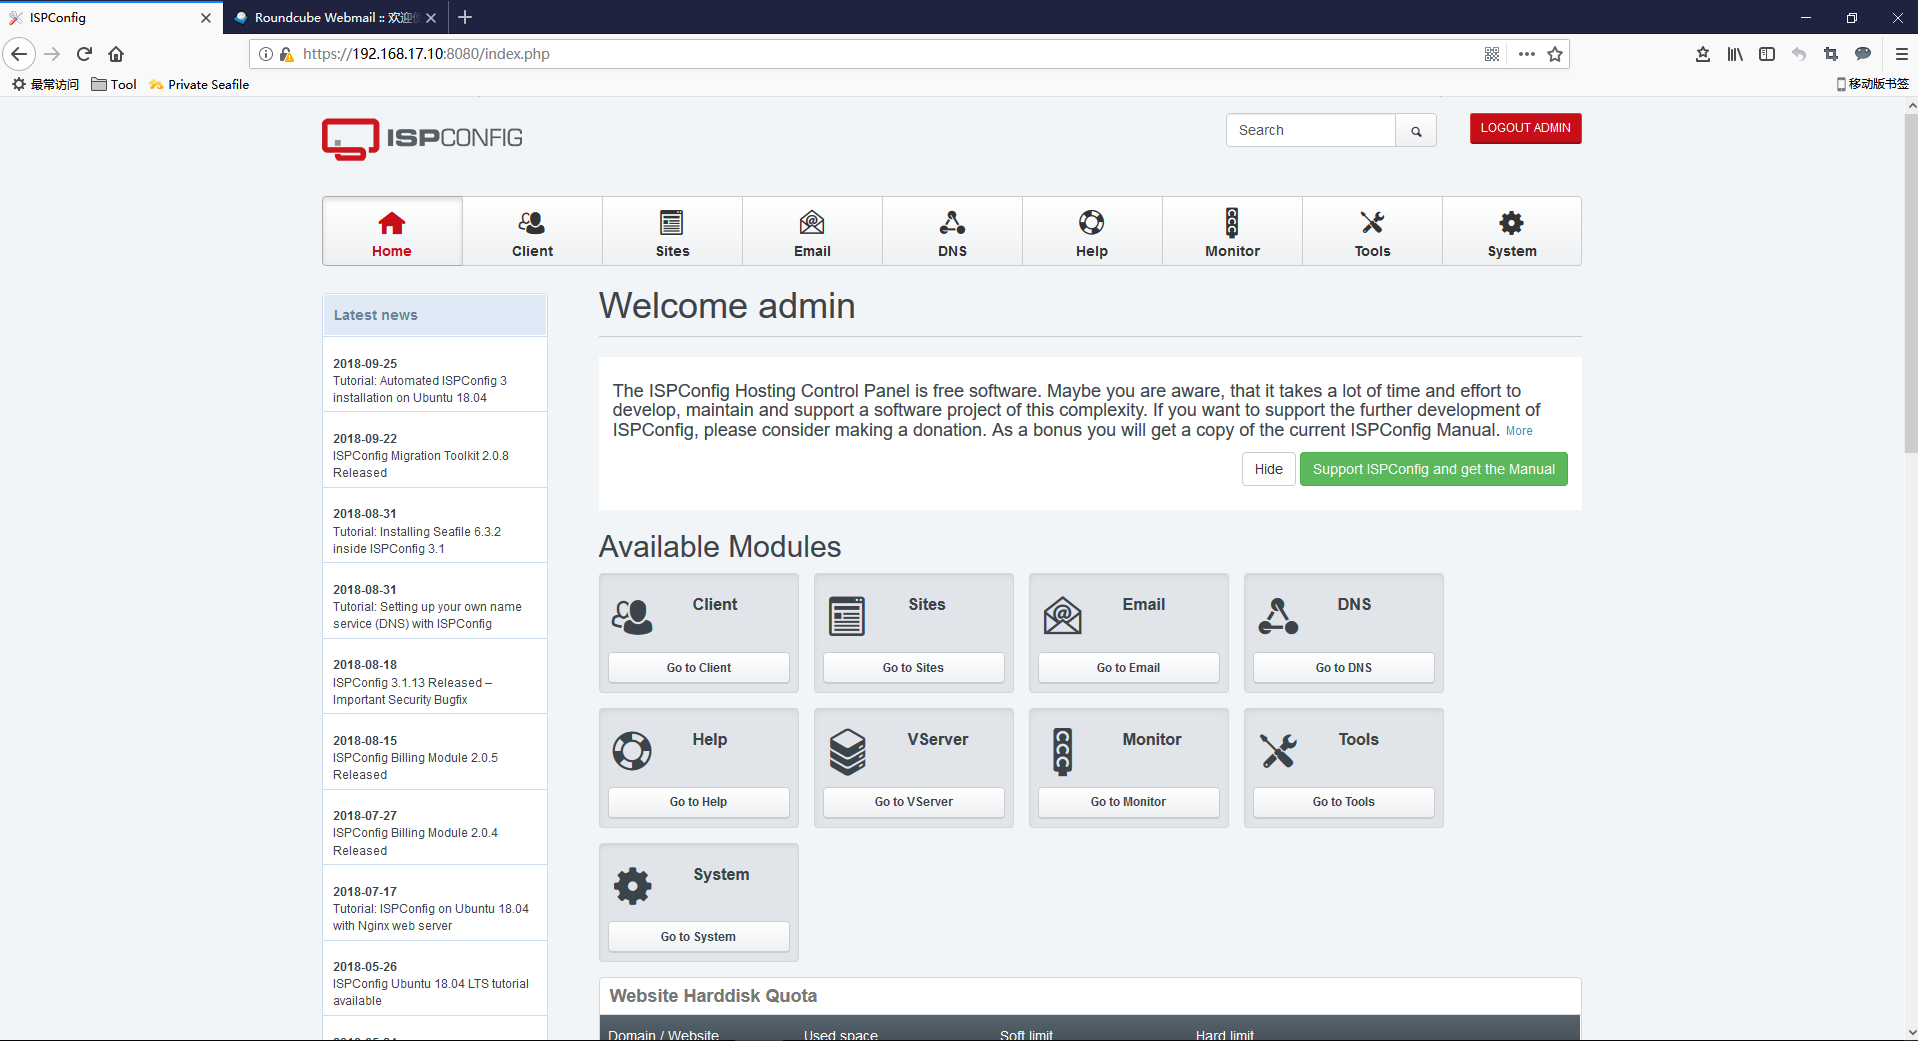
到这里ISPConfig的安装配置是全部完成了。后期我们再来介绍ISPConfig的具体使用