前面我们介绍过了在CentOS中安装Icinga2,Icingaweb2。本篇我们来介绍一下如何将远程Linux机器添加
到Icinga2服务器进行监控。本篇是在上一篇的基础之上进行的,如果需要了解安装部分,请先阅读第一篇:
CentOS7安装配置Icinga2(一)
注意事项
1,为了增强安全性,Icinga2使用SSL证书进行客户机和服务器通信。服务器和客户端通信发生在TCP端口
5665上。因此,请确保您已经配置了防火墙以允许两种方式的流量。
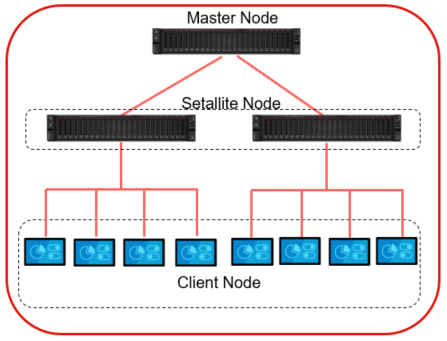
2,在整个Icinga2的分布式架构中,主要有三种节点,Master节点,Satellite节点及Client节点。
Master节点是最顶层的节点,安装Icinga2和IcingaWeb2,它将所有从子节点执行的检查组合成通知呈现
在web页面中。
3,Satellite节点,也就是卫星节点,它介于主节点与客户端节点之间,卫星节点可以从主节点接收服务
或配置信息,然后它可以自己执行检查或者将检查推送给客户机节点执行。即使主节点不可用,卫星节点
同样可以运行。
4,客户机节点,也就是被监控的节点,这个节点从父节点(主节点或卫星节点)接收远程命令并执行,或者
运行自己的配置检查。
环境准备
这里我们将配置Master节点和Client节点,不配置Setallite节点。
master: icinga.kclouder.local 172.16.60.70
client: mariaDB.kclouder.local 172.16.80.57
开始安装
1,安装Icinga2 Master,我们将上一篇中安装的Icinga2服务器配置成Master服务器。
执行以下命令启动配置向导
icinga2 node wizard
Please specify if this is a satellite/client setup (‘n’ installs a master setup) [Y/n]: n //选择”n”
Please specify the common name (CN) [icinga.kclouder.local]: //直接回车
Master zone name [master]: //直接回车
Do you want to specify additional global zones? [y/N]: //选择”n”
Bind Host []: //直接回车
Bind Port []: //直接回车
Do you want to disable the inclusion of the conf.d directory [Y/n]: //选择”Y”
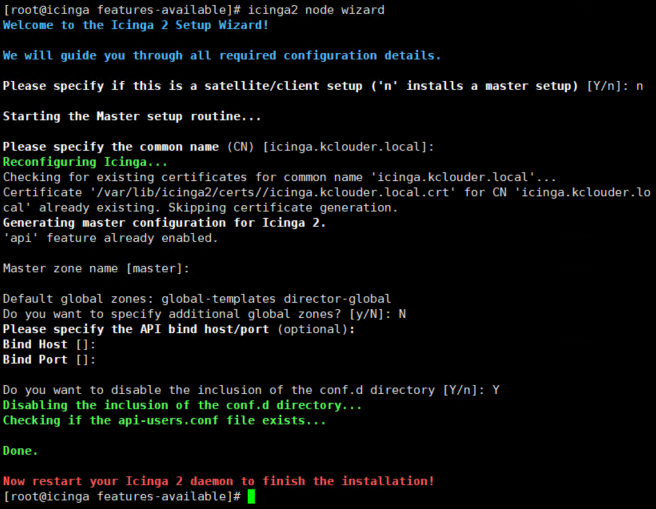
通过以上操作,我们使用Icinga2节点配置向导完成了以下操作:
● 如果还没有启用,它将启用API特性。
● 创建新的证书颁发机构来签署签名请求。
● 生成新的证书签名请求(CSR),使用自己的CA签名
● 将配置项(区域和端点)转储到/etc/icinga2/zone.conf
● 更新/etc/icinga2/constants.conf的ZoneName和TicketSalt
2,验证配置文件
cat /etc/icinga2/constants.conf egrep -i “ZoneNameTicketSalt”

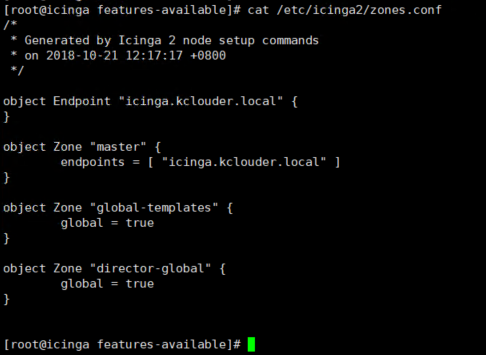
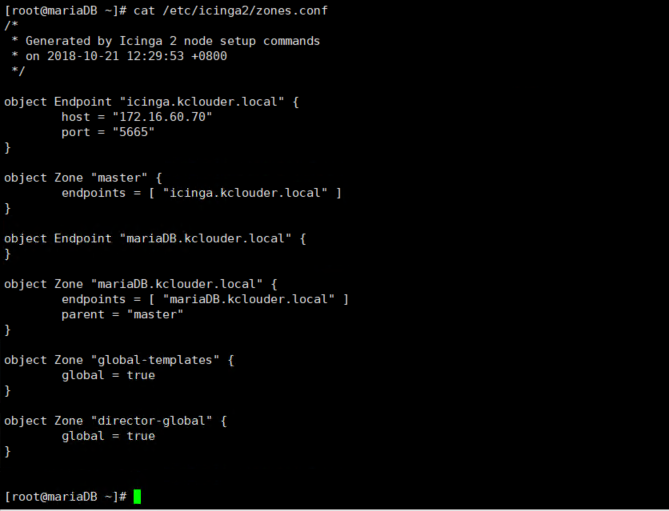
3,确认zone.conf文件中的master节点信息正确
cat /etc/icinga2/zones.conf
4,重启icinga2服务
systemctl restart icinga2
5,生成Ticket,在客户机上运行Icinga2节点向导时,向导会向主节点发送一个证书签名请求。
此Ticket用来自动签署请求
icinga2 pki ticket –cn ‘mariaDB.kclouder.local’

配置Icinga2 Client
1,安装Icinga2 repository
yum install epel-release
rpm –import https://packages.icinga.com/icinga.key
yum install https://packages.icinga.com/epel/icinga-rpm-release-7-latest.noarch.rpm
2,安装Icinga2包和监控插件(Nagios)
yum install icinga2
systemctl enable icinga2
systemctl start icinga2
yum install -y nagios-plugins-all
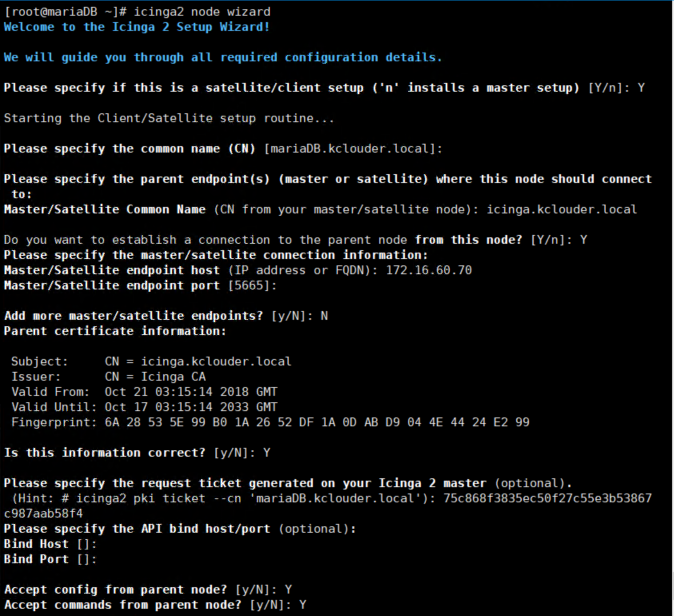
3,执行以下命令启动配置向导
icinga2 node wizard
Please specify if this is a satellite/client setup (‘n’ installs a master setup) [Y/n]: 选择”Y”配置client
Please specify the common name (CN) [mariaDB.kclouder.local]: 直接回车
Master/Satellite Common Name (CN from your master/satellite node): icinga.kclouder.local 输入master节点的hostname
Do you want to establish a connection to the parent node from this node? [Y/n]: 选择”Y”
Master/Satellite endpoint host (IP address or FQDN): 172.16.60.70
Master/Satellite endpoint port [5665]: 直接回车
Add more master/satellite endpoints? [y/N]: 选择”n”
Parent certificate information:
Subject: CN = icinga.kclouder.local
Issuer: CN = Icinga CA
Valid From: Oct 21 03:15:14 2018 GMT
Valid Until: Oct 17 03:15:14 2033 GMT
Fingerprint: 6A 28 53 5E 99 B0 1A 26 52 DF 1A 0D AB D9 04 4E 44 24 E2 99
Is this information correct? [y/N]: 选择”Y”
Please specify the request ticket generated on your Icinga 2 master (optional).
(Hint: # icinga2 pki ticket –cn ‘mariaDB.kclouder.local’): 此处将在master节点生成的Ticket粘贴过来
Please specify the API bind host/port (optional): 直接回车
Bind Host []: 直接回车
Bind Port []: 直接回车
Accept config from parent node? [y/N]: 选择”Y”
Accept commands from parent node? [y/N]: 选择”Y”
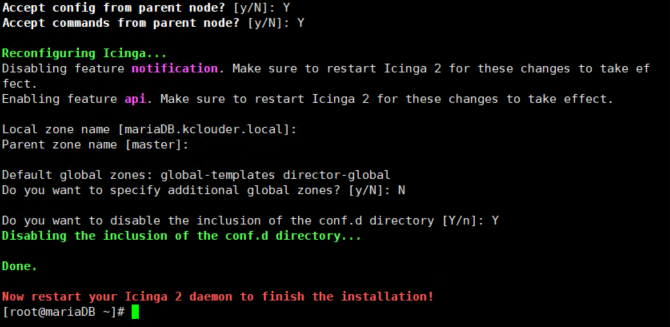
Local zone name [mariaDB.kclouder.local]: 直接回车
Parent zone name [master]: 直接回车
Do you want to specify additional global zones? [y/N]: 选择”N”
Do you want to disable the inclusion of the conf.d directory [Y/n]: 选择”Y”
Now restart your Icinga 2 daemon to finish the installation!
通过上面的配置向导,我们完成了以下操作,
● 客户端向服务器端验证Ticket是否有效
● 从主服务器获取公共证书
4,验证配置文件
cat /etc/icinga2/zones.conf
5,重启icinga2服务
systemctl restart icinga2
配置监控(master)
1,创建目录用于存放监控配置文件
mkdir -p /etc/icinga2/zones.d/master
2,编辑一个新的配置文件
vi /etc/icinga2/zones.d/master/mariaDB.kclouder.local.conf
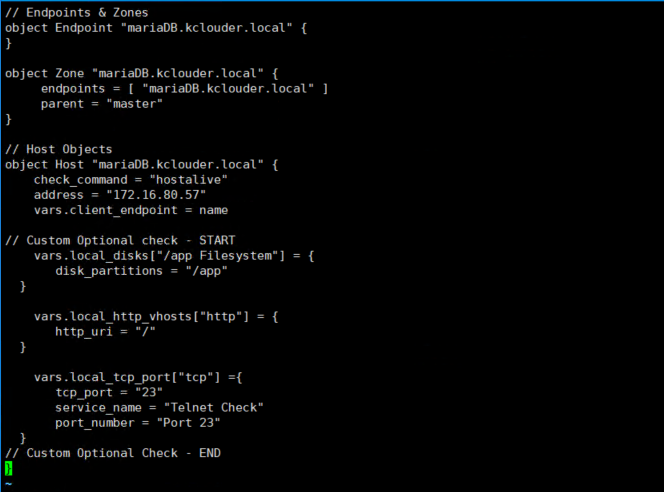
3,由于我们在安装icinga2节点向导期间禁用了conf.d目录,所以这里我们需要手动编辑监控服务项
vi /etc/icinga2/zones.d/master/services.conf
// Ping Check
apply Service “Ping” {
check_command = “ping4”
assign where host.address
}
// System Load
apply Service “System Load” {
check_command = “load”
command_endpoint = host.vars.client_endpoint
assign where host.vars.client_endpoint
}
// System Process Count
apply Service “Process” {
check_command = “procs”
command_endpoint = host.vars.client_endpoint
assign where host.vars.client_endpoint
}
// Logged in User Count
apply Service “Users” {
check_command = “users”
command_endpoint = host.vars.client_endpoint
assign where host.vars.client_endpoint
}
// Disk Usage Check
apply Service “Disk” {
check_command = “disk”
command_endpoint = host.vars.client_endpoint
assign where host.vars.client_endpoint
}
// Disk Usage Check for Specific Partition
apply Service for (disk => config in host.vars.local_disks) {
check_command = “disk”
vars += config
command_endpoint = host.vars.client_endpoint
assign where host.vars.client_endpoint
}
// System Swap Check
apply Service “SWAP” {
check_command = “swap”
command_endpoint = host.vars.client_endpoint
assign where host.vars.client_endpoint
}
// SSH Service Check
apply Service “SSH Service” {
check_command = “ssh”
command_endpoint = host.vars.client_endpoint
assign where host.vars.client_endpoint
}
// FTP Service Check
apply Service “FTP Service” {
check_command = “ftp”
command_endpoint = host.vars.client_endpoint
assign where host.vars.client_endpoint
}
// Icinga 2 Service Check
apply Service “Icinga2 Service” {
check_command = “icinga”
command_endpoint = host.vars.client_endpoint
assign where host.vars.client_endpoint
}
// Apache VirtualHost Check
apply Service for (http_vhost => config in host.vars.local_http_vhosts) {
check_command = “http”
vars += config
command_endpoint = host.vars.client_endpoint
assign where host.vars.client_endpoint
}
// TCP Port Check
apply Service for (tcp_port => config in host.vars.local_tcp_port) {
check_command = “tcp”
vars += config
display_name = + vars.service_name + “ - “ + vars.port_number
command_endpoint = host.vars.client_endpoint
assign where host.vars.client_endpoint
}
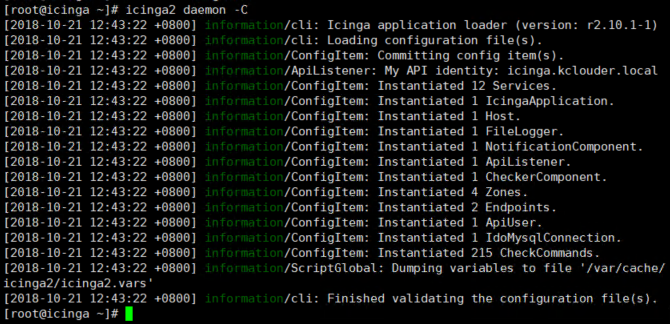
4,编辑完成后,检查配置
icinga2 daemon -C
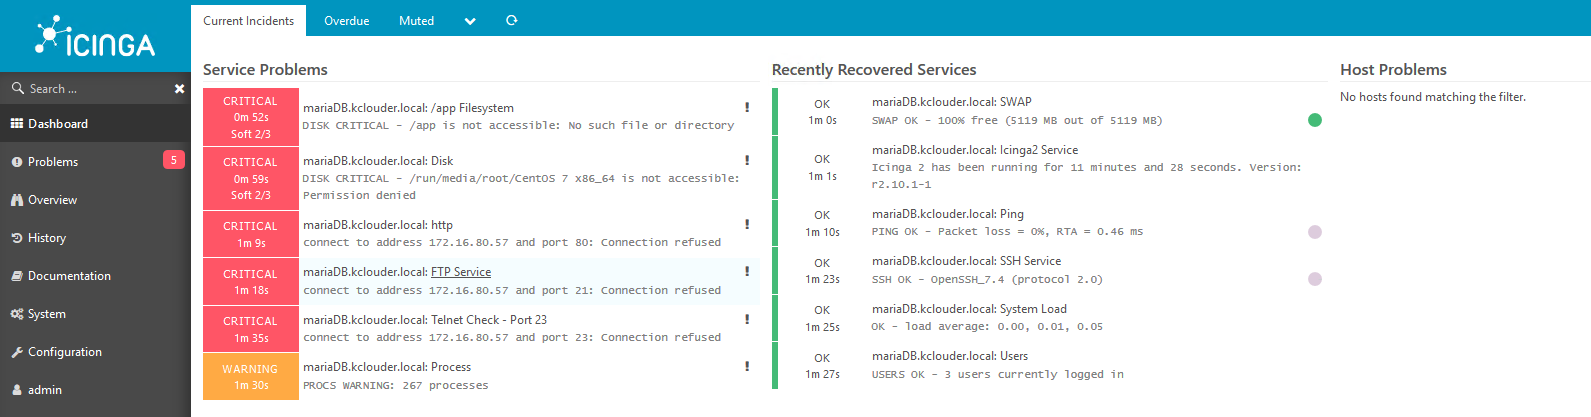
5,在web页面确认可以监控到Linux主机:mariaDB.kclouder.local
到这里,添加监控远程Linux部份就演示完成了。后期我们再介绍Icingaweb2页面的详细使用方法。